⬇️ Download this manual in PDF form Here
![]()
v 1.4.3
Introduction #
Thank you for purchasing Polyverse Music’s Manipulator – a vocal processor created in collaboration with Infected Mushroom. Manipulator uses innovative state-of-the-art algorithms to introduce unique timbre-bending and pitch-shifting effects that are just as useful as they are fun, just as creative as they are practical.
Manipulator can change the sound of vocals and melodic instruments beyond recognition: add presence and character to a wimpy performance, create a mono-compatible pseudo-stereo from mono tracks, and many more goodies.
One of Manipulator’s most exciting features is its ability to pitch-shift the source audio to specific notes received from a MIDI track or an external keyboard. This ability allows zero latency harmonizing, intuitive melodizing and the performance of instant pitch-corrections on the fly.
Make use of Manipulator’s powerful modulators to create anything from natural-sounding voice manipulations, through intricately evolving soundscapes, to crazy and fresh special effects.
This manual gives detailed instructions about proper operation of Manipulator, so we suggest reading it carefully. Some heavier technical information and tips for advanced users appear in side-notes we call “A word to the whiz” – these notes are not necessary for basic, day-to-day operation of the plugin, but they will give you a deeper understanding of the algorithms and let you make the most out of Manipulator.
We hope you enjoy discovering the magic and creativity of voice manipulation!
Best regards,
Infected Mushroom and the Polyverse Team
Credits
Created By: Infected Mushroom
DSP & Code: Polyverse
UX & Visual design: Mr. Frank
Manual: Ithamar Eshpar & Paul Dateh
Special thanks to all of our beta testers who helped make this a better product!
Support
For any support related issues please use our website:
www.polyversemusic.com/support
Setting Up #
Installation #
To install Manipulator, simply run the installer and follow the instructions on screen. For free tutorials and videos about setting up and using Manipulator with your favourite DAW (Digital Audio Workstation), please visit our website at https://polyversemusic.com
When using Manipulator for the first time, a registration dialog will appear. Enter the username and registration code you received in your purchase confirmation e-mail. If you’ve lost your confirmation e-mail, you can re-request one from our support page at https://polyversemusic.com/support.
Presets #

To browse between presets, click the Left/Right arrows located on either side of the preset bar. Clicking directly on the preset’s name will open a pop-up menu which allows you to browse through the folders of factory presets, save an original preset or load a new preset bank.
Note: the user’s original presets are saved to the myPresets folder.
The presets saved can be found in the following locations:
MAC: <user>/Library/PolyVerse/Manipulator/Manipulator-Presets.srb
PC: \Users\<user>\AppData\Roaming\PolyVerse\Manipulator\Manipulator-Presets.srb
With or without MIDI ? #
Manipulator can be inserted into audio or instrument tracks just like any audio effect. However, some of its features involve responding to MIDI notes and MIDI CC messages.
If you would like to use Manipulator as a regular effect, just load it in one of the insert slots on your DAW, and you’re done!
If you want to use MIDI to control the pitch of your voice, please refer to the following pages for instructions on routing MIDI within your specific DAW.
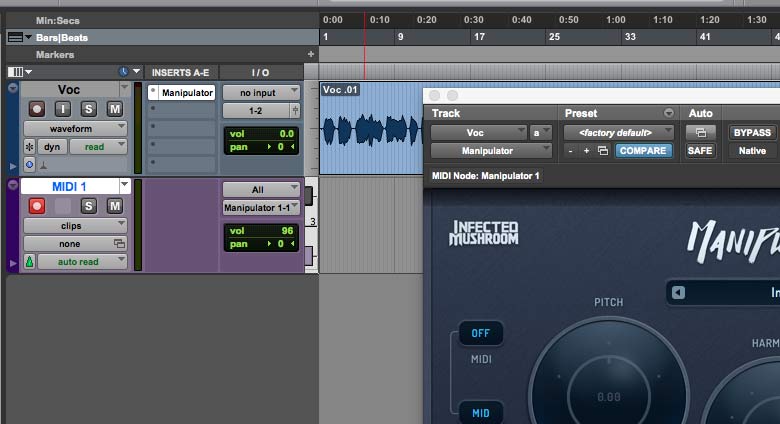
Ableton Live #
- Click the “I-O” button to show the input and outputs.
- Create an audio track, and add some audio onto it.
- Add Manipulator onto the audio track.
- Create a blank MIDI track.
- Set the MIDI track’s output to the audio track with Manipulator.
- While audio is flowing through Manipulator, play some MIDI notes on your virtual or external keyboard controller.
- If this does not work, try selecting the “init” preset
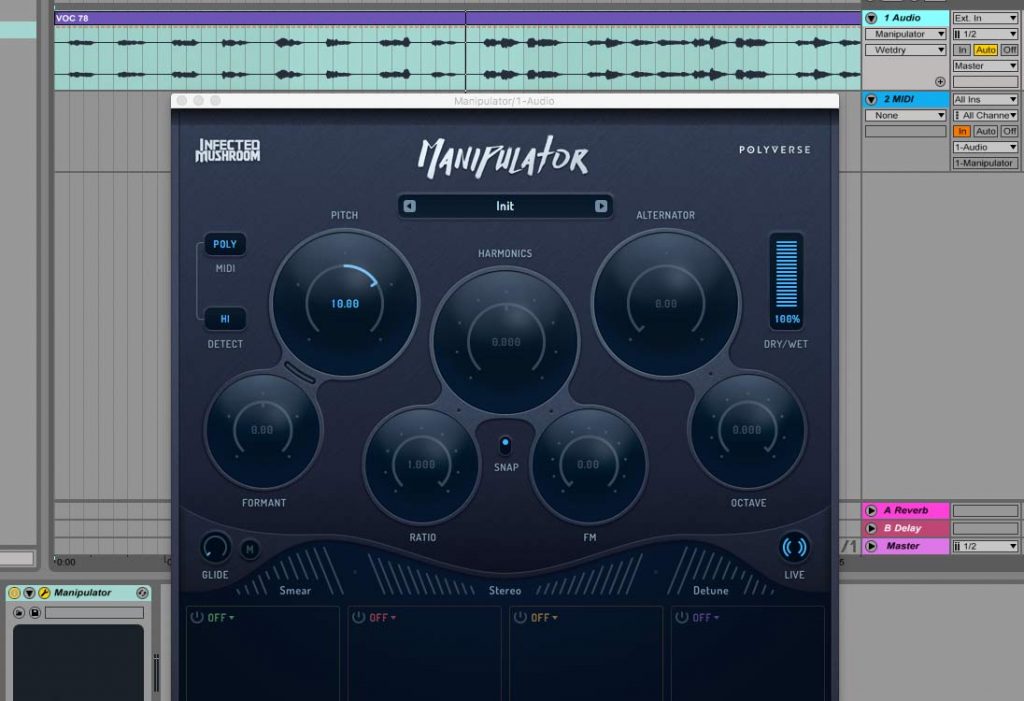
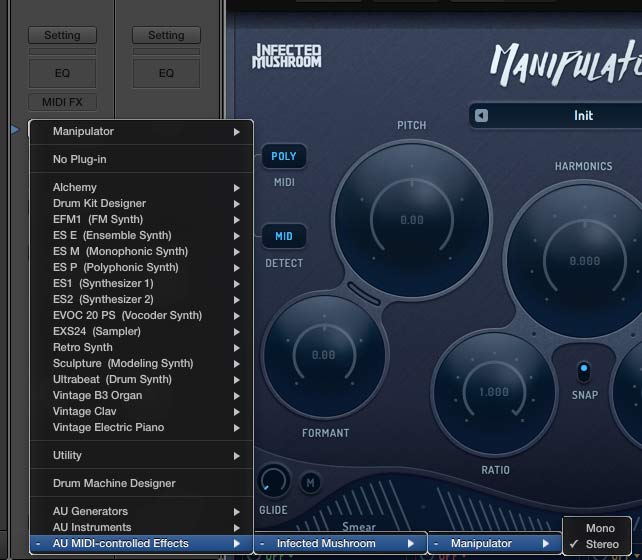
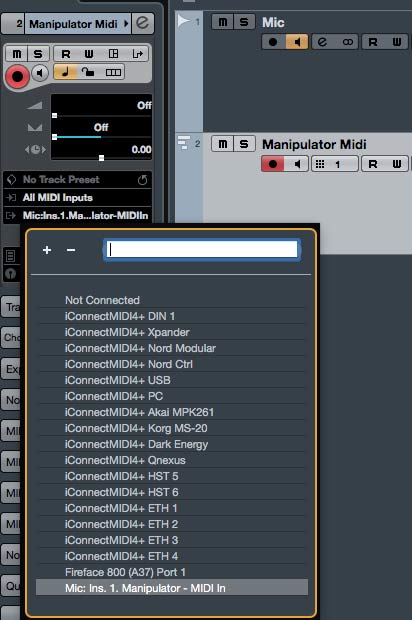
Logic X #
- Open an instrument track.
- Click on the instrument slot to select Manipulator.
- Open a new audio track and place your audio file inside it.
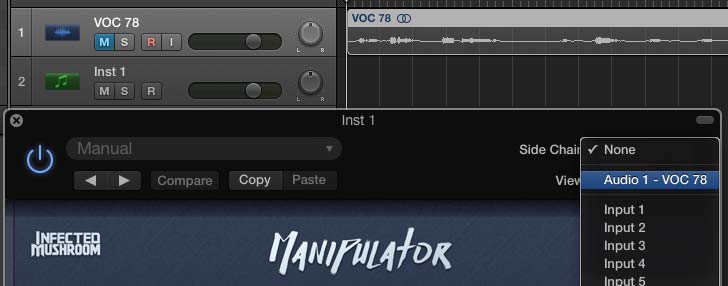
- Open the Manipulator plugin interface. In the top right, select your sidechain input to be the same as the audio track.
- Mute the audio track, as its signal is now being routed through Manipulator.
- Select/Enable the plugin’s instrument track.
- Play some MIDI notes as the audio streams through the plug-in.
- If this does not work, try selecting the “init” preset
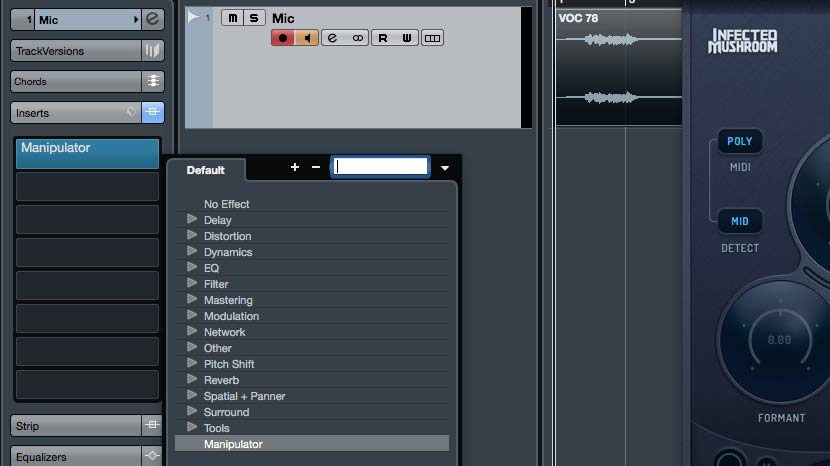
Pro Tools #
- Create a new audio track
- Add Manipulator as an insert effect
- Place an audio file in the track
- Create a new MIDI track
- Route the MIDI track’s output to the plug-in
- Arm the MIDI track
- Play some MIDI notes as the audio streams through the plug-in.
- If this does not work, try selecting the “init” preset.
Cubase #
- Add an audio track
- Add Manipulator as an insert effect
- Place an audio file in the track
- Add a MIDI track
- Set the MIDI track’s output to the Manipulator plugin.
- Play some MIDI notes as the audio streams through the plug-in.
- If this does not work, try selecting the “init” preset
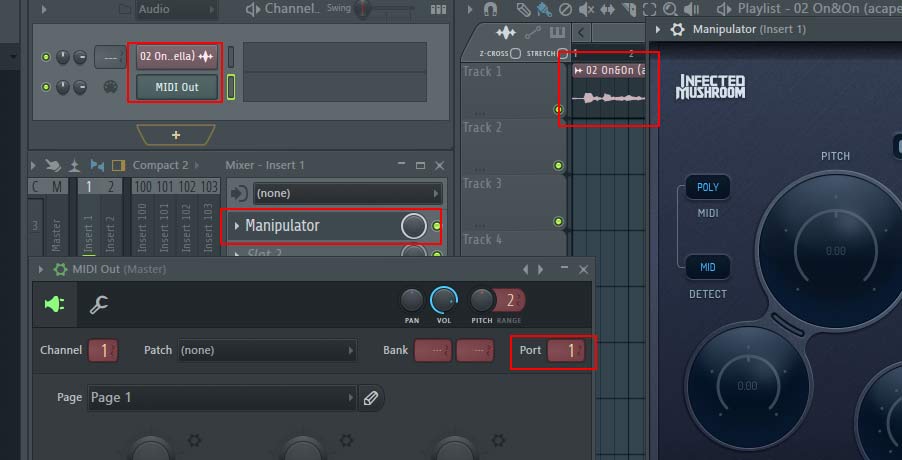
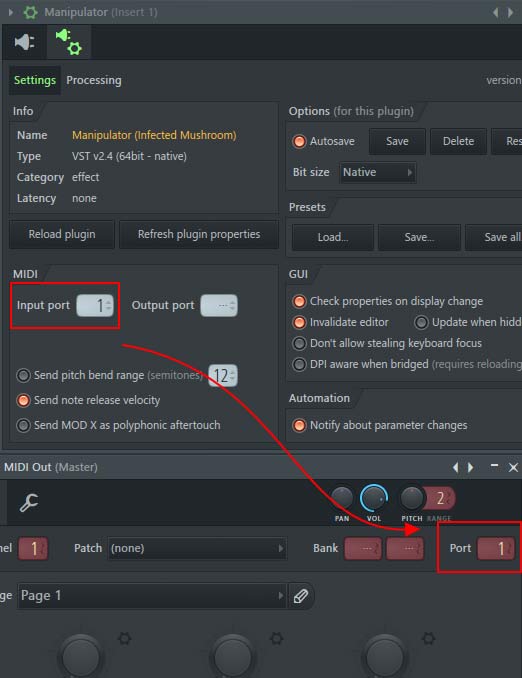
FL Studio #
- Drag an audio file to your playlist and route it to “Track 1” on the mixer.
- Load Manipulator as an insert on “Track 1” on your mixer.
- Open a “MIDI Out” plug-in and set the Port to 1.
- Set the Manipulator MIDI input port to 1 as well
- Select the “MIDI Out” channel,
- Play some MIDI notes as the audio streams through the plug-in.
- If this does not work, try selecting the “init” preset
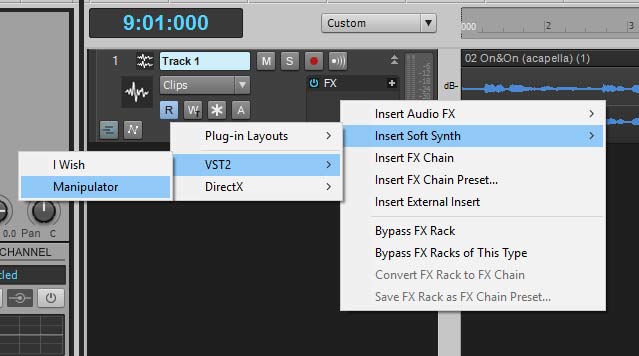
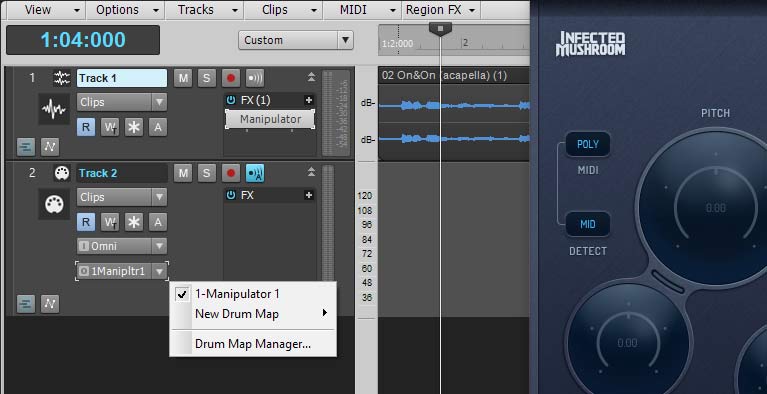
Sonar #
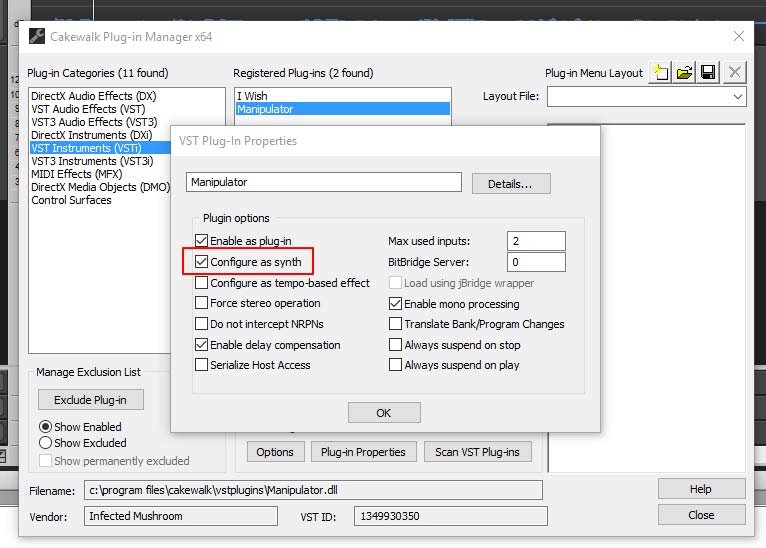
- Configure Manipulator as a synth in “Cakewalk Plug-in Manager”
- Import an audio file to an audio track ,
- Inset Manipulator as a “soft synth” on that track.
- Create a new MIDI track,
- Set the MIDI track’s output to I Wish .
- Play some MIDI notes as the audio streams through the plug-in.
- If this does not work, try selecting the “init” preset.
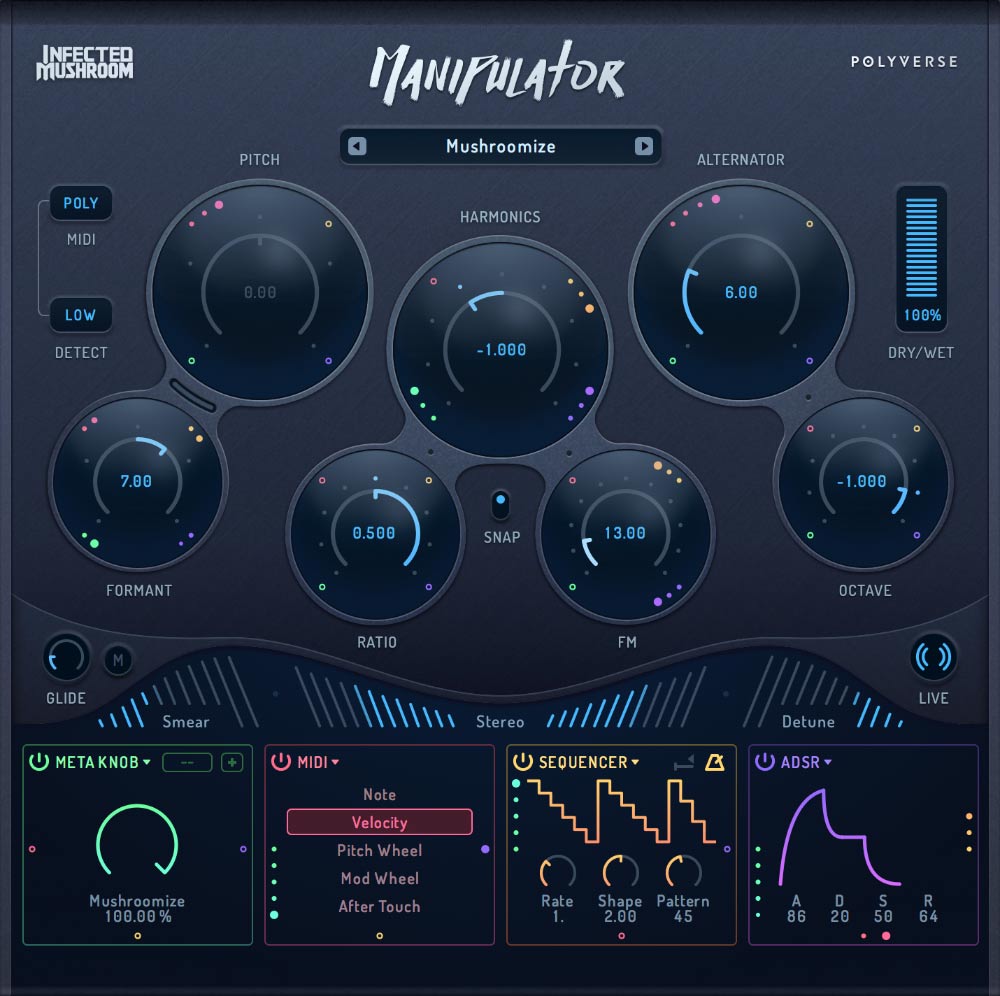
The Main Controls #
Manipulator has three unique voice-manipulating algorithms: Pitch Shifter, Harmonics Shifter, and Grain Alternator. While each algorithm already holds an entire world of possibilities in itself, you can combine algorithms to discover even more exciting effects.
Pitch Shifter #
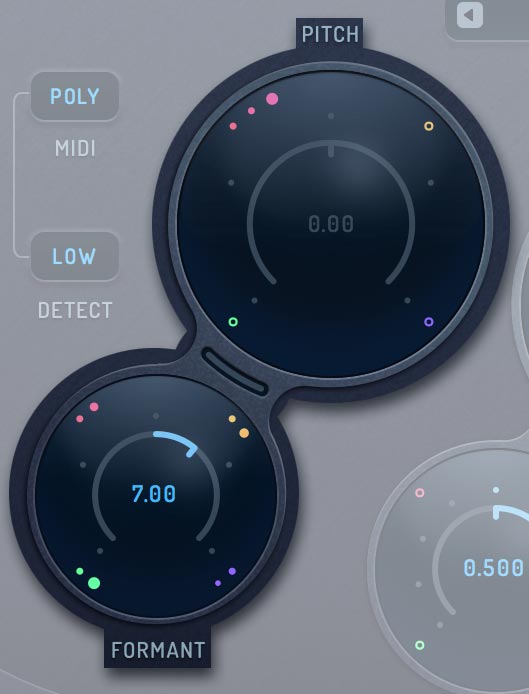
The pitch shifter gives separate control over the pitch and the formants of your audio.
Manipulator slices your audio into small “grains” of sound and plays them back at a different rate or pitch. This algorithm can be set to a wide variety of voice manipulations, from natural-sounding pitch/formant-shifting to extreme “monster pitches”.
Pitch
changes the pitch of the audio without affecting the formants.
Smooth Grains
is a micro-slider located between the Pitch and Formant knobs. Smooth Grains fills the gaps that form between grains when the pitch is being shifted down, resulting in a smoother-sounding pitch shift.
A Smooth Grains value of 100% will produce the most natural sound, while lower values will produce a metallic, robot-like character.
Note: Smooth Grains has no effect when pitch-shifting up.
Formant
Shifts the formants of the audio in semitones without affecting the pitch.
A word to the whiz  | When Smooth Grains is set to 100%, the main parameters interact much like sync oscillators: Pitch acts like the master oscillator, while Formant is like the slave oscillator. Since exactly two cycles of the original pitch fit into one cycle of an octave lower, shifting the pitch 12 semitones down without changing the formant will sound the same as the original audio. To hear the familiar “octave down” effect, dial Pitch an octave down and Formant at least one semitone down. |
Harmonic Shifter #
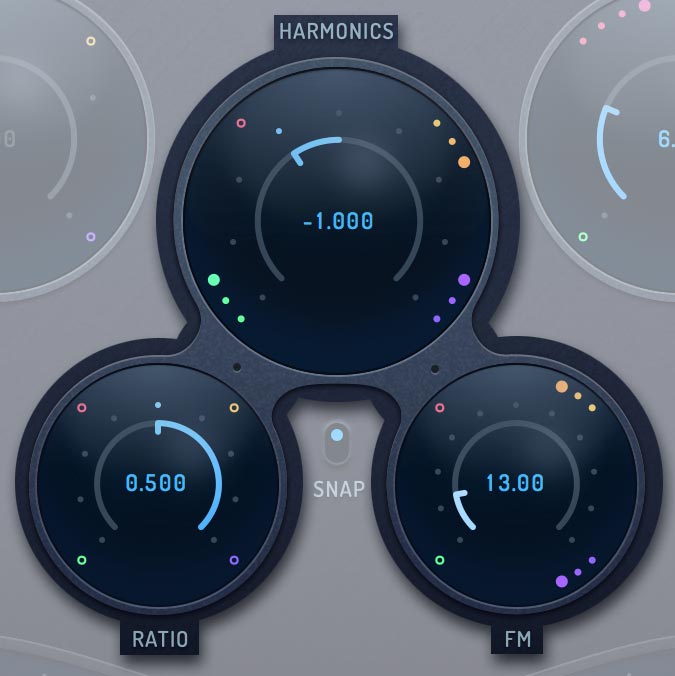
The harmonic shifter shifts the harmonics of the signal by a set ratio. This drastically changes the timbre of the sound without destroying the pitch .
The harmonic shifter is capable of extreme timbre manipulations that can morph your voice into smooth and hollow sounding robots, gritty growling monsters, nasal and piercing electric insects and other synthetic sounding results.
Except for special effects, harmonic shifting might come handy when dealing with a vocalist whose 2nd harmonic is more dominant that their fundamental. Tune the knobdown less than a full step to enhance the fundamental and reduce the amount of 2nd harmonic.
A word to the whiz | The Harmonic Shifter is essentially a frequency shifter with pitch tracking that keeps the harmonic relationships in tact. A frequency shifter is not a pitch shifter – it shifts in Hz and not in semitones. It is also a close relative of the ring modulator! If you wish to fully understand this algorithm, try using it on a steady tone created with an additive synthesizer, and monitor the resulting sound with an FFT analyzer. |
Harmonics
shifts the harmonics of the signal up or down. Each step on the dial represents a complete shift of harmonics by the ratio that is set.
For example – when the control is set to 1, each overtone of the sound will be shifted to the next harmonic position: the 1st harmonic will be shifted to the 2nd, the 2nd to the 3rd, and so on. When Harmonics is set to 2, the 1st harmonic will be shifted to the 3rd, the 2nd to the 4th and so on.
A setting of (-1) will shift the 2nd harmonic down to the fundamental, 3rd harmonic to 2nd etc, and the original fundamental frequency will disappear.
The steps cross fade between one another, so a setting of 1.5 on the Harmonics knob will result in a 50% mix between step 1 and step 2 – and not a harmonic shift of 1.5.
When Harmonics is set to 0 the effect will be bypassed – so Ratio and FM will have no effect.
Ratio
sets the the ratio by which the harmonics shift, relative to the fundamental frequency of the source.
For example – when set to 1 the harmonics will shift in whole steps as mentioned above, but when set to 0.5 (and Harmonics set to 1) the first harmonic will be shifted by just half a step – harmonic 1 will shift to position 1.5, 2 will shift to 2.5 and so on. This creates an interesting octaver effect.
When ratio is set to .25 or .75 there will be a 2-octave shift , and any step in between the sweet spots of the knob will move the overtones to enharmonic positions – resulting in ambiguous pitch.
When Ratio is set to 0, the Harmonics knob will have minimal-to-none effect on the sound.
FM
modulates the frequency (by means of frequency shifting) of the source audio. The modulator is the oscillator driving the harmonic shifter, and thus is affected by the ratio tuning.
Very low values can introduce a nice grit and add some presence to vocals, while large values will achieve increasingly synthetic sounds and textures.
Grain Alternator #
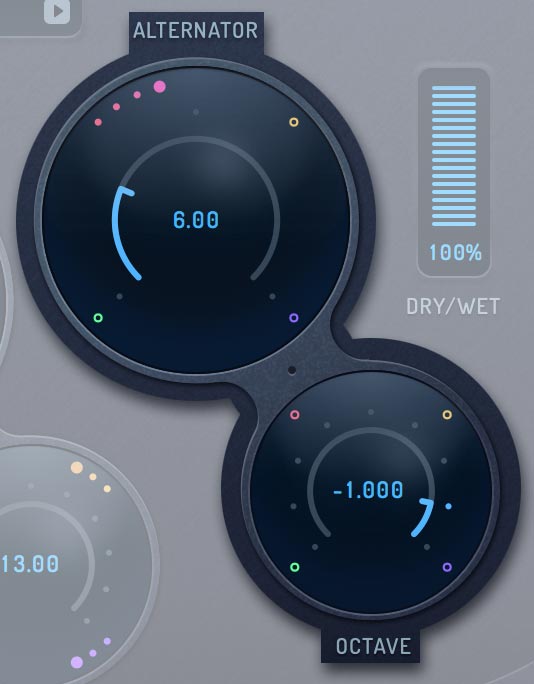
The grain alternator cuts individual cycles into overlapping grains, and shifts the pitch of individual cycles up and down alternatively, creating extreme manipulation to the color of your vocals while maintaining the overall sense of pitch.
Alternator
sets the range of the pitch shift for grains.
For example: a setting of 6.00 will alternately shift individual grains 6 semitones up and down.
When set to zero the effect is bypassed, so Octave will have no effect.
Octave
changes the length of the grains from 1 to 256 cycles – thus up to 8 octaves. Octaves are marked by bright dots and have a cleaner, more focused sound. Setting values between steps will result in a smooth crossfade between the octaves.
Setting Octave up to -3 will add low octaves to the source audio, while more extreme settings will cause the alternator to vibrate at sub-sonic frequencies and create LFO-like modulations in timbre. As a rule of thumb, use Octave settings of -1 to -3 to fatten-up thin voices, and settings of below -4 to create strange and moving soundscapes.
A word to the whiz  | The length of the grain is set in cycles and not in absolute numbers, because the actual size will depend on the pitch of the source: lower notes have longer cycles and will harvest larger grains. Each time we double the size of the grain, we create a lower octave, so grains of 2, 4, 8, 16, 32 (etc) cycles will hold complete cycles of the source. To keep things simple and musical, we prefer to think in octaves. |
The Effects Section #
Manipulator has 3 complementary effects that allow even more sound manipulations: Smear, Stereo and Detune.

Smear
is a granular effect which loops short segments of the sound at timed intervals and crossfades between them (a bit like it’s sibling plugin “I Wish”). The higher the smear value, the longer the distance between the loops.
Please note: Smear comes BEFORE the signal chain of Manipulator’s main algorithms.
Stereo
is a mono compatible, pseudo stereo processor that comes at the end of the signal chain. It widens the stereo image of mono audio sources – as well as stereo sources.
Please note: Stereo will have no effect in mono instances of the plugin. To create stereo from mono tracks insert a mono-to-stereo instance.
Detune
controls an array of slow granular pitch shifters that create a detuned version of the sound. It is essentially a special type of chorus effect.
A word to the whiz  | Manipulator’s algorithms are True Bypass, which means that they are completely transparent when set to zero. This architecture opens up the possibility of using only the effects section as a powerful chorus/doubler effect, without any pitch or formant manipulation, and without worrying about any degradation in the quality of the original source. |
Global Parameters #
Detect (pitch detection range)

Manipulator’s algorithms all rely on its pitch detection engine, which can be fine-tuned to one of three detection ranges: Low, Mid, and High.
Low – 25Hz to 700Hz (good for handling extremely low bass sources)
Mid – 40Hz to 1kHz (recommended for most applications)
High – 80Hz to 4kHz (for flutes, piccolos and extreme soprano singers)
Use the pop-up menu to select a range. Determining which range to select will depend on the nature of your source audio.
Note: Pitch Detection Range doesn’t change when switching presets.
MIDI

Manipulator has the ability to change the pitch of a sound to match a specific MIDI note. This allows on-the-fly re-pitching of vocals into any melody, sequence, or even harmonies.
Manipulator will pitch shift the source audio to the MIDI note(s) it receives, according to one of five MIDI modes:
Off
Playing MIDI notes will not affect the pitch. MIDI messages will only be sent to the Modulators (ADSR triggering, MIDI Messages and Sequencer retrig ).
Mono
In this mode Manipulator will only play one note at a time. Source audio will play in its original pitch until Manipulator receives a MIDI note. Upon receiving a MIDI note, the source audio will be pitch-shifted to that note. Use this mode to temporarily impose specific notes on a vocal track, for quick pitch corrections or for complete re-melodizing of a vocal part.
Poly
Same as Mono mode, but can play chords of up to 4 simultaneous voices. Use this mode to create a live choir from your own voice or to add a unique sound signature to backing-vocals in a recorded production.
M.Gated / P. Gated
These “Gated” variations of Mono and Poly modes mute the plugin when no MIDI is received. This is great for creating gated choir parts from a single track in real time. When either one of the Gated modes is selected, two new knobs will appear near the center of the plugin’s interface: Attack and Release. Use them to fade the sound in and out when notes are played/released.

Please note: this feature will only work when Manipulator is set to receive midi notes (see the quickstart section for details).
Glide Speed
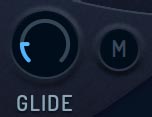
Glide smoothes the the pitch transitions of the incoming audio just like portamento or glide on a regular synthesizer.
Midi Only Glide
The “M” button initiates “MIDI Only“ glide mode, in which pitch transitions will be smoothed only when notes are being played. MIDI mode is perfect for momentary pitch fixes.
Audio/MIDI Indicator

This display opens its mouth when the audio-input level is high, and blinks in bright blue when a MIDI note is on. It can be used to make sure that audio and midi are flowing through the plug-in.
Snap

Snap quantizes Manipulator’s main controls to allow easier reach of important values. For instance, pitch will snap to semitones, harmonic shifter will snap to exact 1/8ths of steps, and so on.
When Snap is turned on, it’s easier to dial to the bright “sweet spots” that can be seen around the main controls of Manipulator. “Sweet spots” mark useful and important positions for each control – exact octaves for Pitch control, whole steps for Harmonics control etc.
If you prefer smoother, more detailed control over Manipulator’s settings, simply turn Snap off.
Note: The Snap parameter does not change when switching presets.
Dry / Wet

Sets the balance between the Manipulated audio and the original source.
You’ll probably set Dry/Wet to 100% most of the time, but try this tip: Mix a small amount of heavily manipulated audio with the original source to add presence and grit to lead vocals and solo instruments.
Modulation #
Manipulator’s main parameters can all be modulated by a number of external and internal sources. Use modulation to tune several parameters with a single knob, make the algorithms responsive to MIDI messages or to the volume of the source audio, modulate parameters with a step-sequenced pattern and more.
To modulate a parameter, first load a modulation source into one of the Modulation Source slots that are located at the bottom of the interface. Once a slot is loaded with a modulation source, matching Modulation Amount controls will appear next to each of the main controls.
Modulation Amount Controls
Modulation controls appear as coloured dots that surround the main controls. The color of the dots represents the source of the modulation, while the numbers and size of dots represents the amount of modulation.
Modulation controls have the same color as the Modulation Source Slot which they represent and will appear only if the slot is enabled.
The controls are bipolar, so sliding them to the maximum will result in positive modulation, while turning them to the minimum will result in negative modulation.
By default, turning the controls up will modulate the parameter towards the maximum and turning them down will modulate towards the minimum. These settings can be changed to clockwise/counter clockwise by right clicking the control and selecting “set mod Clockwise”.
Modulation controls have a special design which allows tuning to accurate positions easily: the first dot represents 0%, i.e no modulation, the second dot represents a 25% influence of the modulator over the parameter (or -25% in the opposite direction), the third dot represents an influence of +/-50%, the fourth dot represents 75%, and the fifth dot indicates that the parameter is modulated by the full value of the corresponding (same colored) slot.
In the example above, the red modulation control sets the amount of modulation applied by the red modulation slot to 100%. The orange control to -50%, the purple to +75% and the green one is tuned to 0.
Cross-Modulation
It is possible to use one Modulation Source as an amplitude modulator for another modulation source to create intricate modulations and achieve more elaborate behavior of the plugin.
To create cross-modulations, simply slide the Modulation Amount controls that appear around each Modulation Source slot.
When a slot is modulated, its level will change according to the level of the slot that is modulating it. For example: When an envelope is being modulated by Midi Velocity, it will act like a classic velocity sensitivity slider, where more modulation means more velocity range.
Here are several useful examples:
- Classic mod-wheel action: have a the modulation wheel control the amount of vibrato coming from a step sequencer.
- Fade in an LFO (sequencer) by modulating it with an envelope.
- Control several Meta knobs with one Meta knob – a Meta-meta knob!
- A more elaborate example would be to modulate the Pitch parameter with an LFO and the Harmonics parameter with an ADSR, while a single meta-knob controls the amount of both modulations at the same time. The level of the Meta-Knob can in turn be modulated by MIDI After-Touch, and so on.
Modulation Slots #
Four slots are available, each of which can hold one of the five modulation sources: Meta Knob, MIDI, Sequencer, Follower and ADSR.
The Modulation Source Slots are color coded to match their relevant Modulation Amount controls.
Note that several slots can hold the same type of modulation source, but each source will be independent – so you might have “a blue sequencer”, “a red sequencer” etc, each with its own settings.
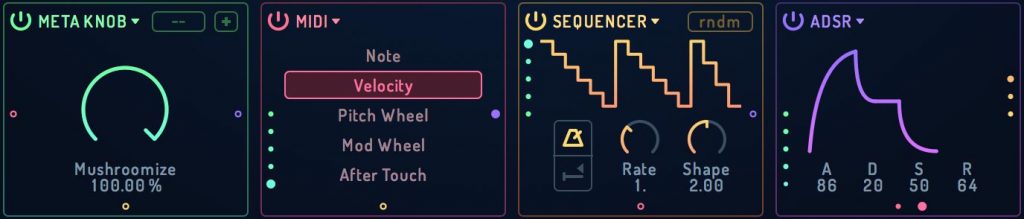
Slot Selector
To load a modulator into a slot, click on its name and select from the choice of available modulators.
Each modulator can be set independently and routed to affect different parameters.
ON/OFF
![]()
Use this switch to enable or disable a slot. A disabled slot appears to be empty and will have no effect on the sound. Once a slot is turned ON, it’s matching Modulation Amount controls will appear on the plugin’s surface, and modulation fun begins!
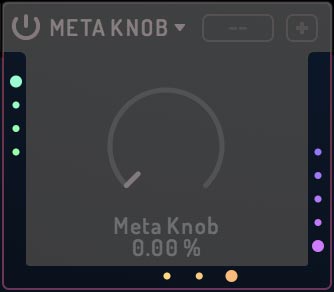
Meta Knob #

Allows you to modulate several parameters with a single knob.
Uni/Bi Polar
The button (at the top right of the slot) selects the knob’s type. Knobs can be positive-unipolar (ranging 0% to 100% and marked “+”); negative-unipolar (ranging -100% to 0% and marked “-”); or bipolar (ranging -100% to 100% and marked “B”)
Steps
The selector (left of the Uni/Bi Polar button) makes the knob snap to 1-128 discrete steps of equally spaced values.
Set Steps to “–” to disable snapping and have a smooth continuous knob
Name
Meta Knobs can be given meaningful names to clarify their action in a preset. To rename a knob simply double-click on its title (which is right below the actual knob) and enter a new name.
Value Monitor
The current output of a knob is displayed as a percentage value below its title. Changing the knob’s output is as easy as double-clicking the number and entering a new value, but remember that if the knob is divided into Steps, then the value you typed will snap to the nearest possible step.
ADSR #
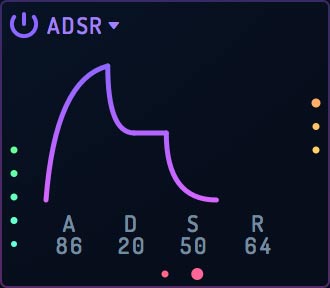
A classic four-stage envelope generator, triggered by incoming MIDI notes.
Attack
sets the amount of time it will takes for the envelope signal to climb from 0% to 100% once a MIDI note is received.
Decay
sets the amount of time it will take for the envelope signal to drop from 100% to the sustain level. The Decay stage is initiated immediately after the Attack stage is completed.
Sustain
sets the level at which the envelope signal will be held after the decay stage is completed.
Release
sets the amount of time it will take for the envelope signal to drop back to 0% after the MIDI note is released.
MIDI #
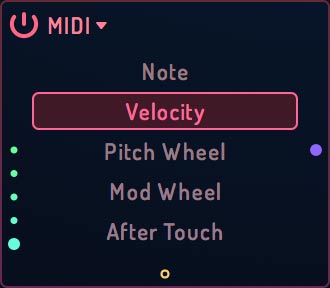
converts MIDI messages into a modulation signal.
Simply highlight the type of MIDI message to be converted:
Note: a bipolar value representing the pitch of incoming MIDI notes, C3 being the center pitch (a value of zero), covering a range of 0-1 per octave
Velocity: a unipolar value from 0 to 1, representing the velocity of incoming MIDI notes
Pitch Wheel: a bipolar value ranging from -1 to 1
Modulation wheel: a unipolar value ranging from 0 to 1.
After Touch: a unipolar value ranging from 0 to 1.
Note: ADSR and MIDI will respond to MIDI messages even if Manipulator’s MIDI mode is OFF.
Follower #
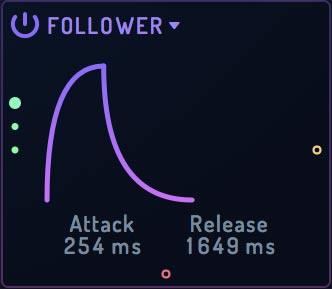
An envelope follower that converts the amplitude of the source audio into a unipolar modulation signal.
Attack
controls the smoothness of positive changes in amplitude (signal is going from quiet to loud). Increasing the attack time will result in smoother and slower amplitude transitions in the attack stage.
Release
controls the smoothness of negative changes in amplitude (signal is going from loud to quiet). Increasing the release time will result in smoother and slower amplitude transitions in the release stage.
Sequencer #
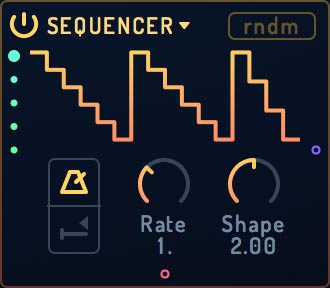
creates a triggered/free LFO or step sequencer.
Pattern
(Text box slider on the top right) loads one of 100 preset patterns (numbered from 0 to 99) into the Sequence Editor.
Once a pattern has been loaded it can be edited manually.
Switching to another pattern will discard any edits.
Random pattern: Tuning the Pattern selector to the maximum (until it reads “rndm”) will create a new, random pattern every time.
Tempo Sync
(Metronome icon) will quantize the LFO rate to the tempo of your project. If the Retrig button is off while Tempo Sync is enabled, the LFO will be synchronized to the song position. If Retrig is active, the LFO will sync to the beginning of each incoming MIDI note.
Retrigger
(Below tempo sync) will reset the sequencer/LFO position to the beginning of the waveform every time a MIDI note is received.
Rate
sets the frequency of the LFO. When Tempo Sync is enabled, Rate will be set in beat divisions (¼, ⅛ etc). When Tempo Sync is disabled, Rate will be set in Hz.
Shape
provides a way to smooth the transitions between individual steps of the sequencer, so a wide variety of patterns can be created from a single setting of the Sequence Editor. Use this knob to gradually morph between five smoothing methods:
0: rounded transitions (great for creating curvey LFOs)
1: straight lines
2: distinct steps
3: 16th step drops (signal will decay back to zero after each step, good for grooves)
4: curved 16th step drops (same as method 3 but more punchy)
Sequence Editor
allows you to either intuitively draw or carefully design your own sequences and LFOs. Hover with the mouse over the sequencer’s shape to show the editor. To edit the steps, use these techniques:
- Click-drag over the editor to draw a new freehand pattern
- Right click individual steps to have fine control over their value
- Shift-drag to quantize the values of steps to quarters
- Alt-drag to quantize the values of steps to 1/12ths. This editing mode can be used to facilitate a melodic sequence of pitch-shifting.
- Double click a step to zero it out
- Command-drag (Mac) or Control-drag (PC) to zero several steps at once.
Extra Features #
Right-click (or control-click on a Mac) any control on the plugin to receive the following menu:
Detect MIDI CC
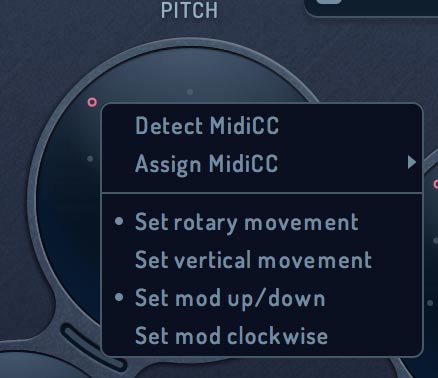
To use the “MIDI learn” feature, click the Detect MIDI CC option for the desired control, and then move the knob or fader on your controller that you wish to associate with that control. The plugin will wait for a MIDI control change signal, and then assign the control number and channel to the corresponding control on the plugin.
Assign MIDI CC
If you need to assign a MIDI CC to a control manually (e.g. your DAW is sending multiple simultaneous MIDI messages), hover over Assign MIDI CC and then choose the desired CC number from the pop-out menu.
Set rotary movement
Sets the knobs to have a circular control motion. While this option may seem less intuitive, it offers much more precision for fine tuning your plugin knobs. Tip: After you click the knob, move in large circles around it. Larger circles will result in finer resolution.
Set vertical movement
Sets the knobs to have a vertical (up and down) control motion. Although rotary controls are recommended, some users find vertical controls more comfortable.
Set mod up/down
Select this option if you want to rotate the main Modulation knobs up to reach maximum (positive modulation) or down to reach minimum (negative modulation).
Set mod clockwise
Select this option if you want to rotate the main Modulation knobs clockwise to reach maximum (positive modulation) or counterclockwise to reach minimum (negative modulation).
MIDI Program change
You may send program changes on MIDI CC# 119 the control value will correspond to the preset order in the “myPresets” folder.
MIDI All notes off / Panic
Sending a MIDI CC# 123 will send an “All notes off” midi command to the synthesizer. MIDI CC# 120 is a panic control – and will completely restart the plugin.
Controlling Controllers #
Reset to default
To reset a controller to its default value, double-click or Alt-click it.
Fine Tune
To fine tune a controller press “Shift” while dragging the controller.
Fine tune overrides Snap Mode, so a good practice would be to keep Snap ON, coarse-tune with the mouse to a sweet spot, then press shift and fine-tune a few milli-steps away from the sweet spot.
Note: in Fine Tune mode, the control will temporarily switch to Vertical movement mode, even if Rotary movement is selected
Text Values
Most of Manipulator’s controls have a numeric display which shows their current value. To type in a specific value, simply double-click the number and enter a new value.
Enjoy using Manipulator!