⬇️ Download this manual in PDF form Here
![]()
By
User Manual V1.3.5
Gatekeeper:
The Infinitely-Customizable Volume Modulator.
Thanks for purchasing Infected Mushroom’s Gatekeeper, made by Polyverse Music!
Gatekeeper is a volume modulator capable of producing sequenced volume patterns, MIDI gates, stutter effects, pseudo-sidechain (ducking) effects, planned dynamics, creative gain clipping, and much more. It is unmatched as an “in-your-face” gate and is without a doubt the punchiest, most dynamically versatile volume tool on the market.
Gatekeeper can produce CV and MIDI output for external hardware, boost signal for a distorted clipping effect, and smooth signal so that even the most drastic gates have no clicks or pops. Its most impressive quality is its versatility: it can act as an LFO, an envelope, a step sequencer, and more while creating sample-accurate automation.
Gatekeeper supports VST2 / VST3 / AU / AAX plug-in formats.
Getting Started #
Installation #
To install Gatekeeper, simply run the installer and follow the instructions on screen. For free tutorials and videos about setting up and using Gatekeeper with your favorite DAW (Digital Audio Workstation), please visit our website at https://polyversemusic.com/support
When using Gatekeeper for the first time, a registration dialog will appear. Drag and drop the key file you have received in your purchase confirmation e-mail onto the dialog box.
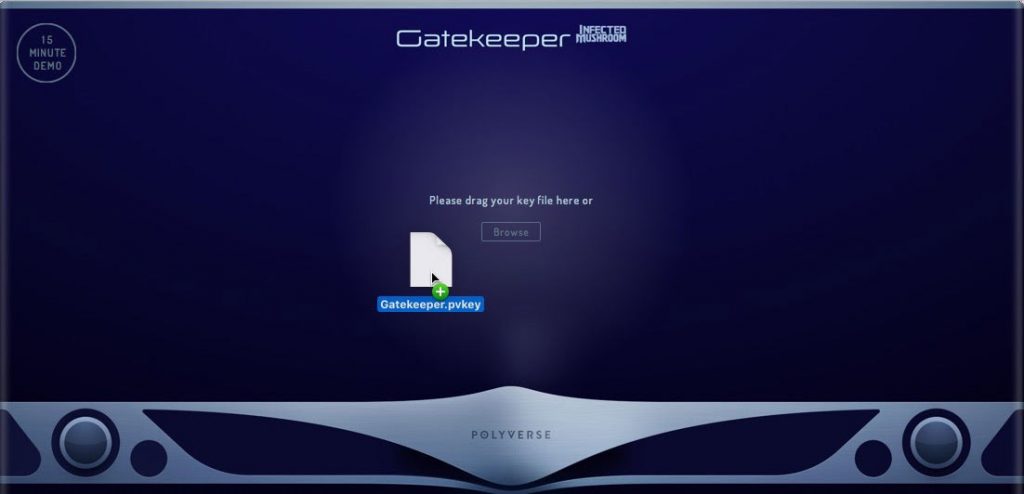
If you’ve lost your confirmation email, you can re-request one from our support page at https://polyversemusic.com/support.
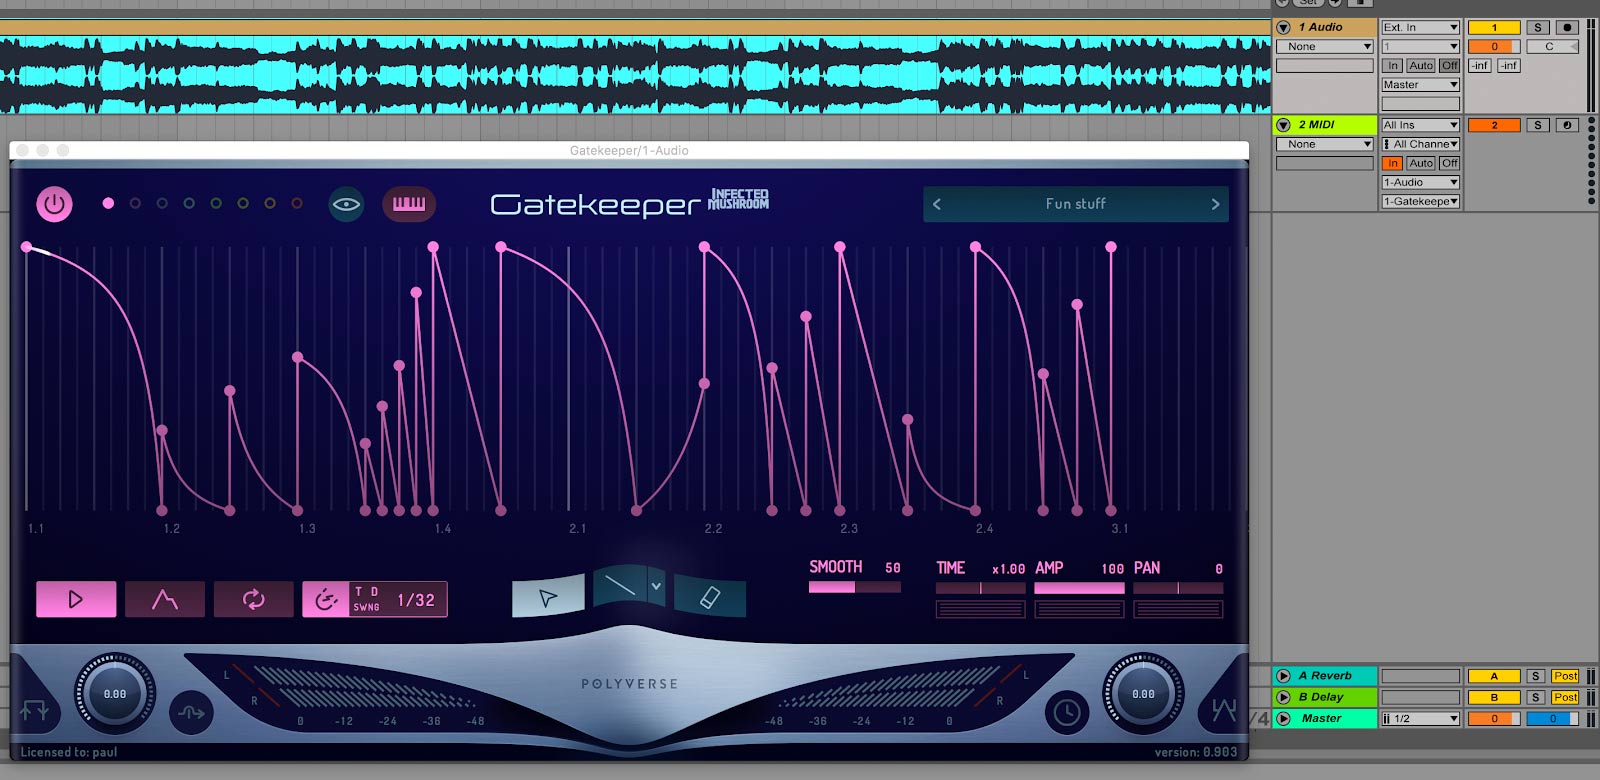
Presets #
![]()
To browse Presets, click the Left/Right arrows located on either side of the Presets Bar. Clicking directly on the Presets Bar will open a pop-up menu which allows you to browse through the folders of factory presets, save an original preset, or load a new preset bank.
Note: the user’s original presets are saved to the myPresets folder.
Saved presets can be found in the following locations:
MAC: <user>/Library/PolyVerse/Gatekeeper/Gatekeeper-Presets.ppb
PC: \Users\<user>\AppData\Roaming\PolyVerse\Gatekeeper\Gatekeeper-Presets.ppb
With or Without MIDI? #
Gatekeeper can be inserted into audio or instrument tracks just like any audio effect. However, some of its features involve responding to MIDI notes and MIDI CC messages.
If you would like to use Gatekeeper as a regular effect, just load it in one of the insert slots on your DAW, and you’re done!
If you want to use MIDI to separately trigger the envelopes manually, please refer to the following pages for instructions on routing MIDI within your specific DAW.
Ableton Live #
- Click the “I-O” button to show the input and outputs.
- Create an audio track, and add some audio onto it.
- Add Gatekeeper onto the audio track.
- Create a blank MIDI track.
- Set the MIDI track’s output to the audio track with Gatekeeper .
- While audio is flowing through Gatekeeper , play some MIDI notes on your virtual or external keyboard controller.
- Switch off “Auto play”
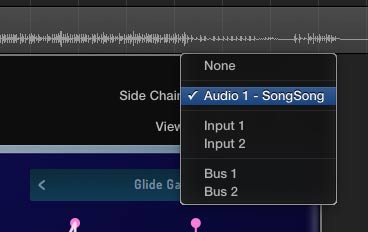
Logic X #
- Open an instrument track.
- Click on the instrument slot to select Gatekeeper.
- Open a new audio track and place your audio file inside it.
- Open the Gatekeeper plugin interface. In the top right, select your sidechain input to be the same as the audio track.
- Mute the audio track, as its signal is now being routed through Gatekeeper.
- Select/Enable the plugin’s instrument track.
- Play some MIDI notes as the audio streams through the plug-in.
- Switch off “Auto play”
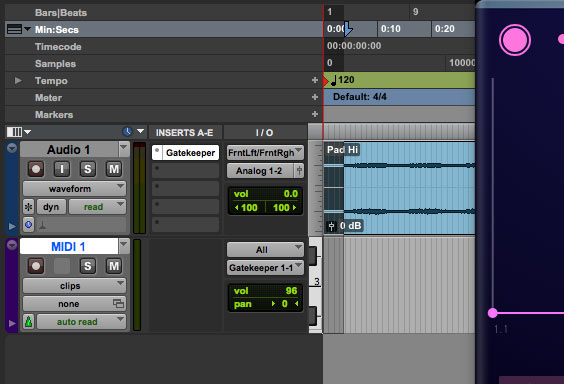
Pro Tools #
- Create a new audio track
- Add Gatekeeper as an insert effect
- Place an audio file in the track
- Create a new MIDI track
- Route the MIDI track’s output to the plug-in
- Arm the MIDI track
- Play some MIDI notes as the audio streams through the plug-in.
- Switch off “Auto play”
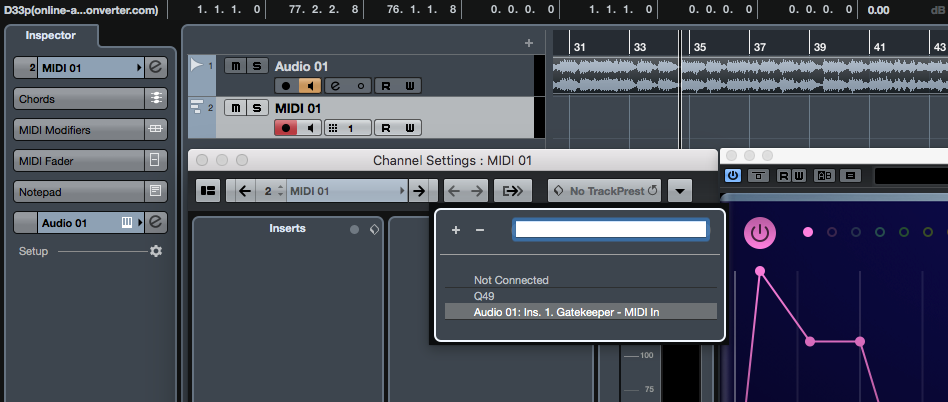
Cubase #
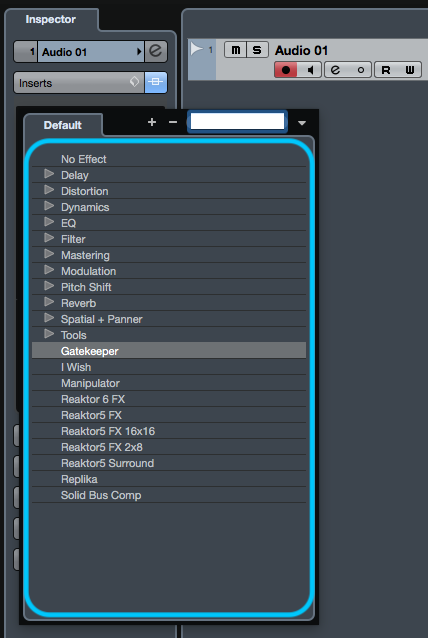
- Add an audio track
- Add Gatekeeper as an insert effect
- Place an audio file in the track
- Add a MIDI track
- Set the MIDI track’s output to the Gatekeeper plugin.
- Play some MIDI notes as the audio streams through the plug-in.
- Switch off “Auto play”
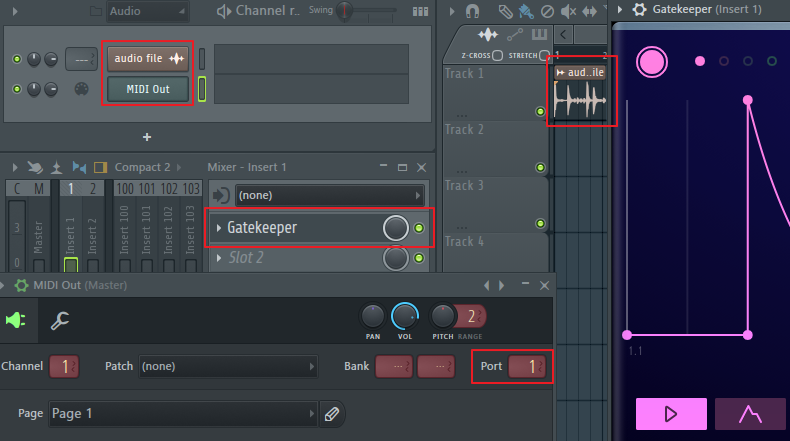
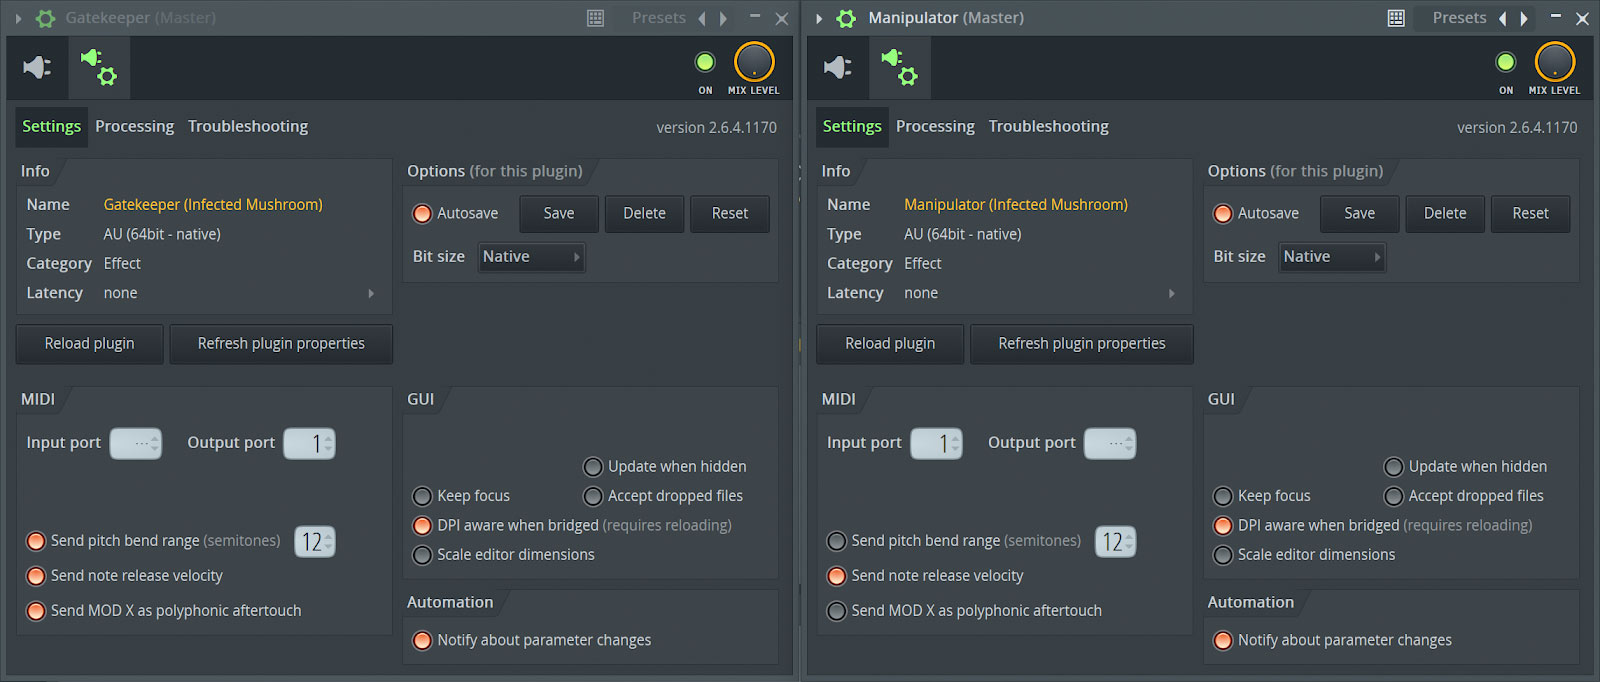
FL Studio #
- Drag an audio file to your playlist and route it to “Track 1” on the mixer.
- Load Gatekeeper as an insert on “Track 1” on your mixer.
- Open a “MIDI Out” plug-in and set the Port to 1.
- Set the Gatekeeper MIDI input port to 1 as well
- Select the “MIDI Out” channel,
- Play some MIDI notes as the audio streams through the plug-in.
- Switch off “Auto play”

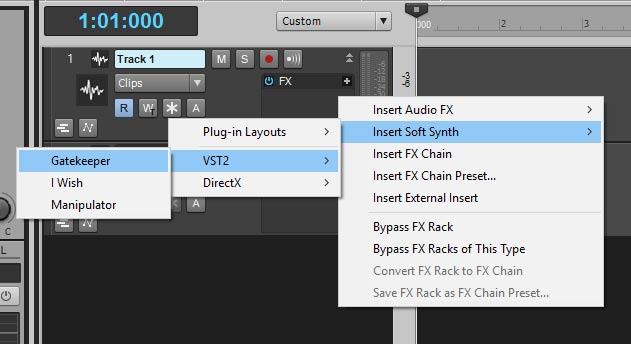
Sonar #
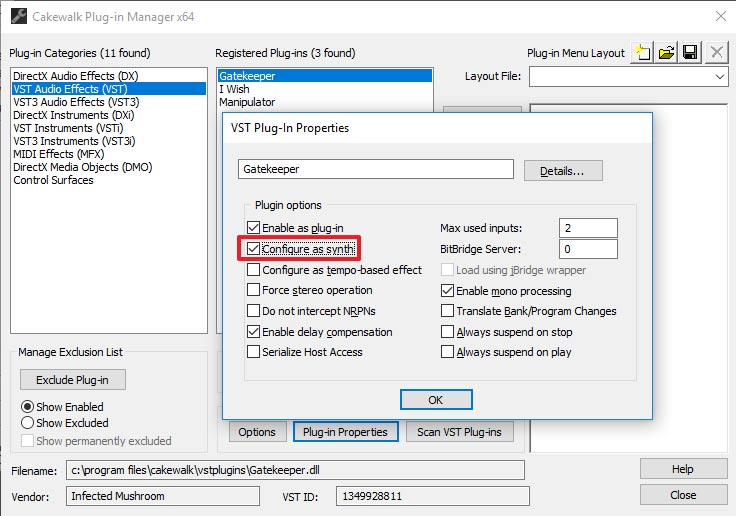
- Configure Gatekeeper as a synth in “Cakewalk Plug-in Manager”
- Import an audio file to an audio track ,
- Inset Gatekeeper as a “soft synth” on that track.
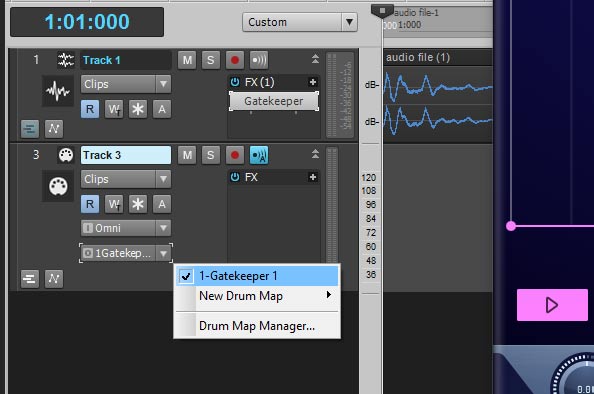
- Create a new MIDI track,
- Set the MIDI track’s output to I Wish .
- Play some MIDI notes as the audio streams through the plug-in.
- Switch off “Auto play”
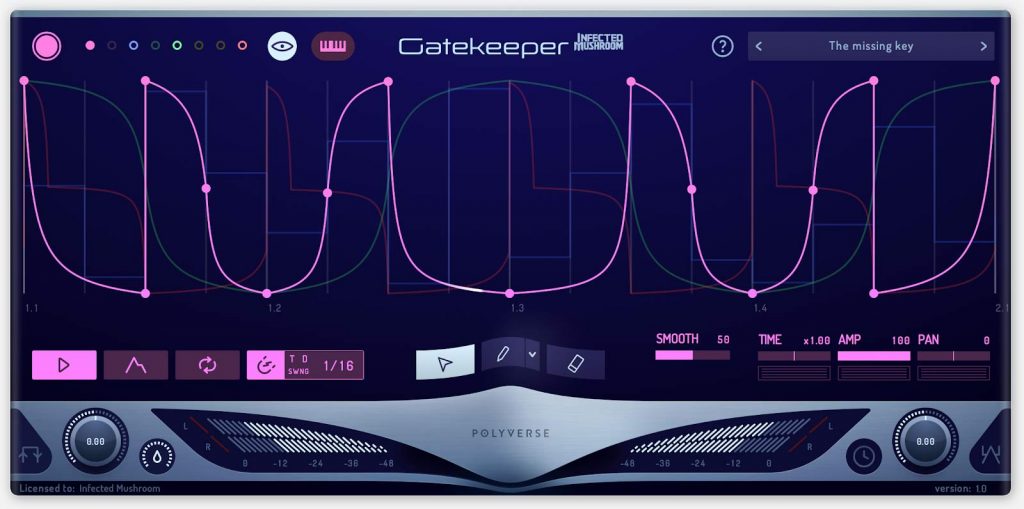
USER INTERFACE #
Overview #

① Envelope Selector & MIDI Controls
② Presets Browser
③ Envelope Grid
④ Envelope Trigger and Grid Controls
⑤ Envelope/Node Creation Tools
⑥ Envelope Modulation Controls
⑦ Input/Output Control Bar
Envelope Selector and MIDI Controls #
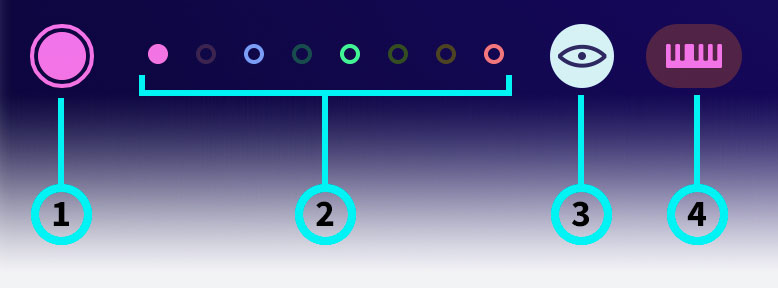
① Envelope Enable/Disable On/Off – enable or disable the 8 individual envelopes.
② Envelope Selectors – select one of the 8 envelopes for editing. Combine the envelopes to create panning effects, polyrhythms, layered parts or trigger them separately
③ Show All Enabled Envelopes – offers a toggled background view of all enabled envelopes.
④ MIDI Note Learn – this allows an envelope to respond only to the keys you teach it. Click the button to enter “Learn Mode” (the button will become highlighted). Play your desired MIDI notes. You can play as many notes as you like in whichever order you choose. When finished, click the button again to exit “Learn Mode”. The envelope will now be triggered only by the notes you have chosen.
When no notes are “learned”, the envelope will be triggered by any note pressed.
| ! | QUICK TIP Using the MIDI Note Learn feature it is possible to assign 8 different envelopes to 8 different notes, and also to assign a single key to trigger any combination of envelopes for stereo effects or building complex polyphonic envelopes. |
Envelope Trigger & Grid Controls #
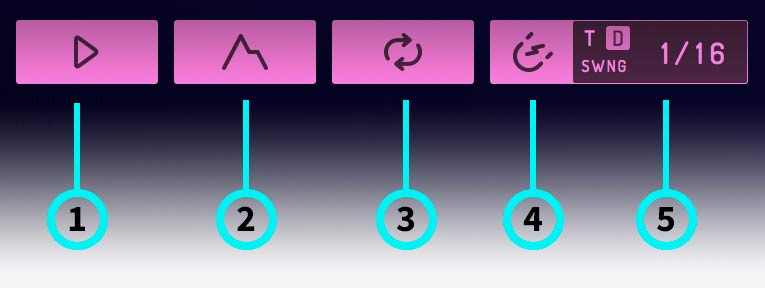
① AutoPlay – When engaged, the envelope will trigger and repeat continuously. When on, the envelope will ignore MIDI input.
② Envelope Mode – When enabled, moving a node will automatically shift all following nodes (like an envelope would). When disabled, each node can only be moved within the space between its surrounding nodes. The maximum time between nodes is 10 seconds.
③ Sustain Loop – allows you to set an internal loop within the envelope as defined by the Loop Start and Loop End points. These Start and End points can only exist on a node. To define the loop start and end points, simply right-click on a node and select “Loop Start” or “Loop End”. You can also easily drag the handles of the loop markers to your desired nodes. Loop start and end nodes will snap to the same amplitude when moved to avoid clicks.
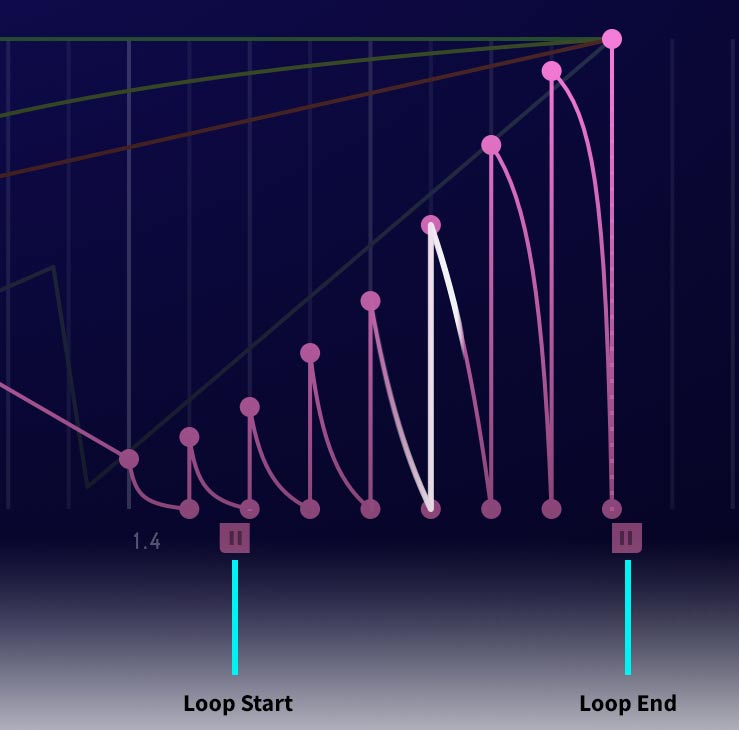
When using MIDI notes to trigger the envelope, The envelope will iterate through the segments. When it reaches the Sustain Loop, it will loop until the note is released. Gatekeeper will then play the remainder of the envelope that follows the Loop End point. When the sustain loop is off, it will play a one shot version of the envelope – from start to end – ignoring “note off” signals. Overlapping notes will not retrigger the envelope (Legato).
When on auto play, the envelope will only loop between the loop boundaries.
| ! | QUICK TIP The sustain loop is a handy tool for midi envelopes. Try drawing an LFO between the loop points on an ADSR style envelope for a more interesting sustain stage |
④ Snap – When enabled, nodes will snap to Gatekeeper’s grid. You can also easily toggle Snap on and off by typing “S” on your keyboard.
⑤ Grid – the Grid can be set to note values ranging from one full bar down to 128th notes. It can also be displayed in “TIME” by seconds. Click and drag up or down on the note value to adjust the Grid. You can also double-click to type in custom grid values.
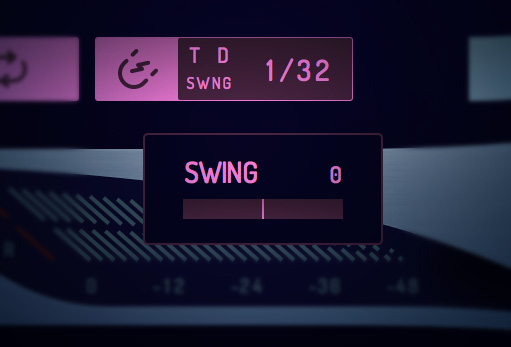
The Grid can be modified by activating (D) Dotted, (T) Triplet, or Swing. When Grid is set to TIME value and AutoPlay is active, the envelope will not sync to your Host BPM.
Grid Swing – Applies a swing or shuffle rhythm to the Grid. Applying Swing does not move nodes. Use Quantize (press q) to quantize nodes to the Grid.
Envelope/Node Creation Tools #

Edit Tool – The main tool for Gatekeeper. It allows you create, select, and move nodes within the Envelope Grid.
| Create a new node | Click anywhere along the line segmentsDouble click on the background of the envelope |
| Delete a node | Double click the nodeSelect the node(s) and press backspace or delete |
| Move a node | Click and drag the node |
| Change the curve | Right-click or Control-click along the line segments and drag |
| Zoom In / Out | Use the mouse wheel Right click on the background of the envelope and drag up/down (this provides a stepped zoom in/out so you can keep your scrolling position easily)Use shortcuts: “[“ and “]” or “↑” and “↓” |
| Scroll left/right | Right click on the background of the envelope and drag left/rightIf you have a trackpad or a compatible mouse – scroll left and rightUse shortcuts: “,” and “.” or “→”and”←” |
| Select Nodes | Click the background of the envelope and drag to selectShift + click the nodes Once nodes are selected, you may copy, paste, delete, automate, boost and quantize. |
| Scale Nodes | Select more than one node (you may also select only the beginning and end of the section you would like to scale)Press shift, and then click drag a node to scale the selectionGrabbing the nodes on the left will scale to the right, while grabbing nodes on the right will scale to the left. Grabbing top nodes will expand the amplitude range while grabbing the bottom will compress it |
| Copy | Select the nodes you want to copy and:Right click > select CopyType “c” on your keyboardNote: This will only work when two or more nodes are selected |
| Paste | Select the node you want to paste at or select two nodes to paste between and:Right click > select PasteType “v” on your keyboardThis is only work when there is a copied shape |
| Duplicate | Select the nodes you want to duplicate and:Type “d” on your keyboardThis will only work when two or more nodes are selected |
| Undo | Right click > select UndoType “u” on your keyboard |
| Redo | Right click > select RedoType “r” on your keyboard |
| Quantize | This will quantize nodes to the nearest grid lineRight click > select QuantizeType “q” on your keyboard |
| Boost x10 | This will create a node that is 10 times louder. You may use the clip function to tame it.Right click > select Boost x10Select the node and type “b” on your keyboard |
| Load Envelope | You may load individual envelope patterns from within presets:Right click > select Load Envelope > select the preset and envelope slot you would like to load |
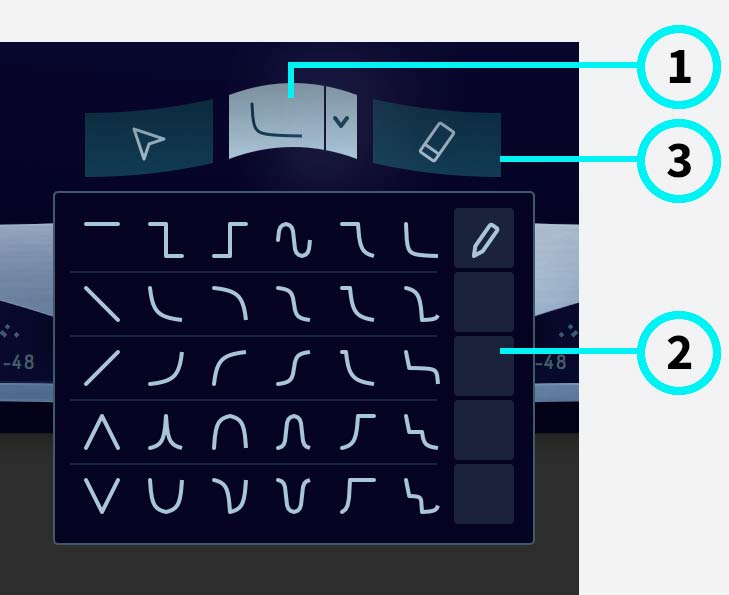
① Paint Tool – The Paint Tool allows you to draw envelopes based on a number of available preset shapes. Each shape contains an arrangement of several nodes.
② Paintbrush Shapes – We have assembled an array of thirty useful brush shapes to help you quickly create rhythmic sequencers, LFOs, pseudo-sidechain effects (ducking), and more!
To select a brush, click the “down arrow” to open the brush menu, or right click the envelope while in brush mode.
When you copy a shape with less than 8 nodes, it will appear as an extra brush on the menu!
③ Eraser Tool – Easily erase nodes by clicking and dragging around the grid with this tool.
Envelope Modulation Controls #
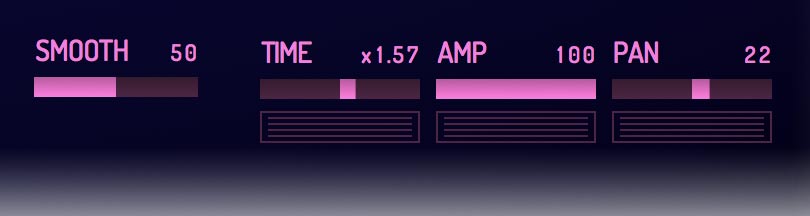
SMOOTH – smooths out pops and clicks while maintaining the punchiest possible envelope.
[Applies a filter that curves the peaks of the envelope itself. With 0 smoothing, the envelope is sample fast. However, when the envelope is faster than the audio it modulates, clicks may occur, the smooth slider allows you to tune the envelope to be just as fast as the audio coming in, providing the punchiest possible envelope without clicks.]
TIME – Adjusts the speed of the envelope from 0.1x to 10x.
AMP – Allows you to set the amplitude of each envelope.
PAN – Pan.
MIDI Modulation Control Panel #
The MIDI Modulation Control Panel allows you to control the Time, Amp, and Pan parameters using MIDI note value input. It can be accessed by clicking on any of the three icons below the Envelope Modulation Controls.
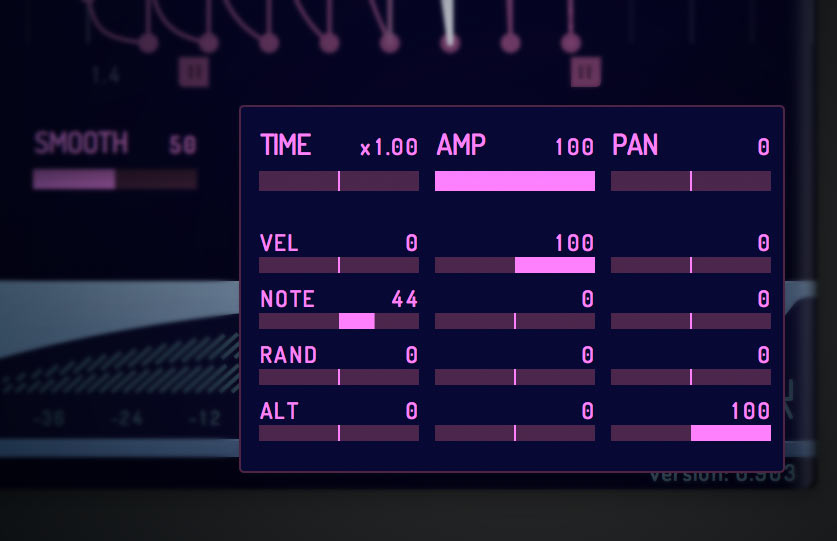
VEL (Velocity) will affect the parameter based on the intensity of the note, ranging from 0 to 127. Is only available when using midi input (not available in AutoPlay mode).
NOTE will affect the parameter in accordance with the range of the keyboard (not available in AutoPlay mode).
RAND (Random) will adjust the parameter to a random setting every time a note is triggered.
ALT alternates between the maximum and minimum of whichever parameter if affects.
Time Rand and Alt are disabled when plugin is synced to the host (auto play is on
| ! | QUICK TIP Modulate Amp by vel for velocity sensitivityMoulate Time by note for natural string emulationsModulate Pan by Alt to Alternate panning each note |
Input/Output Control Bar #
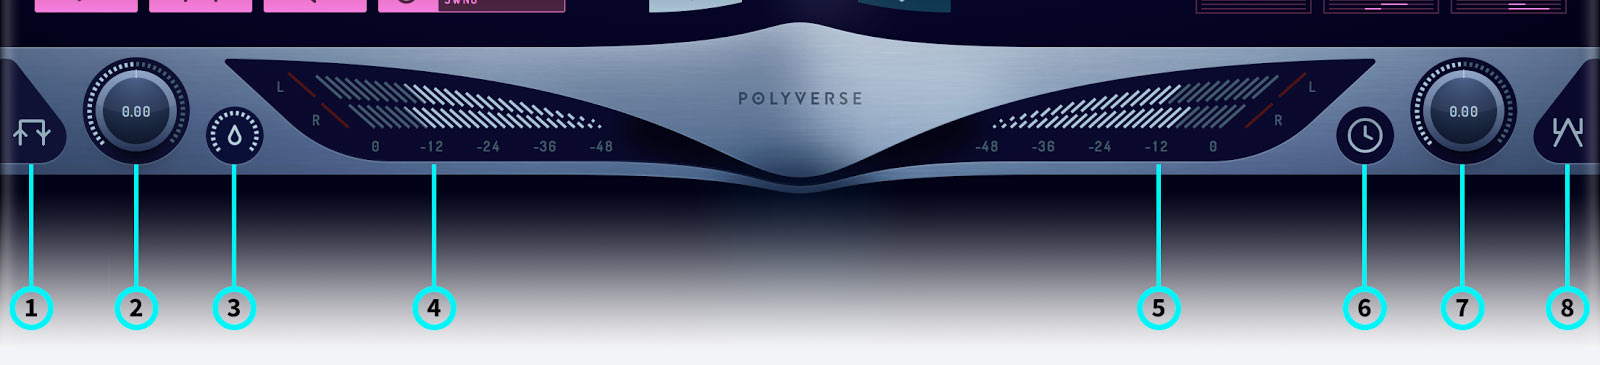
① Trigger – triggers the envelope one time. Clicking and holding will send a “note on” signal; releasing will send a “note off” signal. Trigger (and MIDI note input) will not work in Auto Play mode.
② Input Volume – Amplifies the signal before the signal chain, useful for driving the clip/saturation algorithm. Ranges from minus infinity to +12dB. To reset Input Volume to zero, double click the knob.
③ Wet – Sets the balance between the processed audio and the original source.
④ Input Level Meters – These meters visualise the volume of the incoming audio signal through the input amplifier (post fader). To reset the meters, simply click on them.
⑤ Output Level Meters – These meters visualize the volume of the output audio signal (post fader). To reset the meters, simply click on them.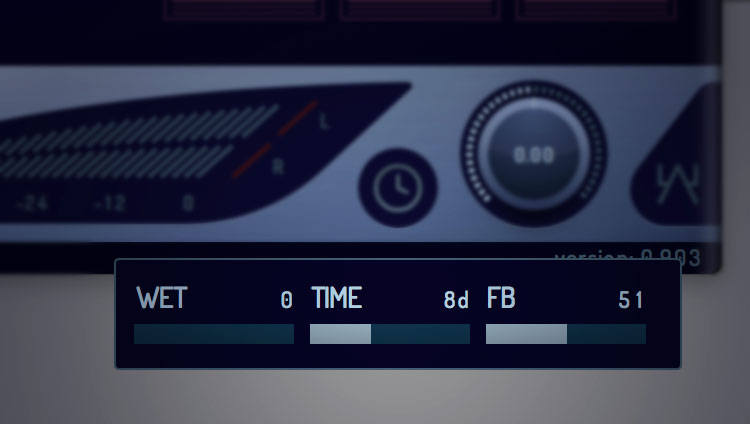
⑥ Delay – Stereo Ping Pong Delay
WET: adjusts the amount of the delayed signal
TIME: controls the length of time between any two repetitions of your signal as defined by note duration value (i.e. 8d = dotted 8th notes).
FB (Feedback): determines the amount of repetitions
⑦ Output Volume – Amplifies the signal after the signal chain, useful for reducing the volume after the clip/saturation algorithm. Range: from minus infinity to +12dB. Double click to center to Zero.
⑧ Clip – Gatekeeper offers a simple clipping and saturation algorithm that is useful for taming the envelope while retaining its punch. This is especially useful when used with the Boost function for achieving a punchy sound!
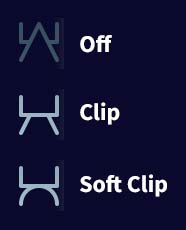
Off – Clip is off.
Clip –Gatekeeper will clip audio at 0dB (before the output knob).
Soft Clip –Clipping will have a slight curve for a softer and rounder sound.
Additional Features & Important Information #
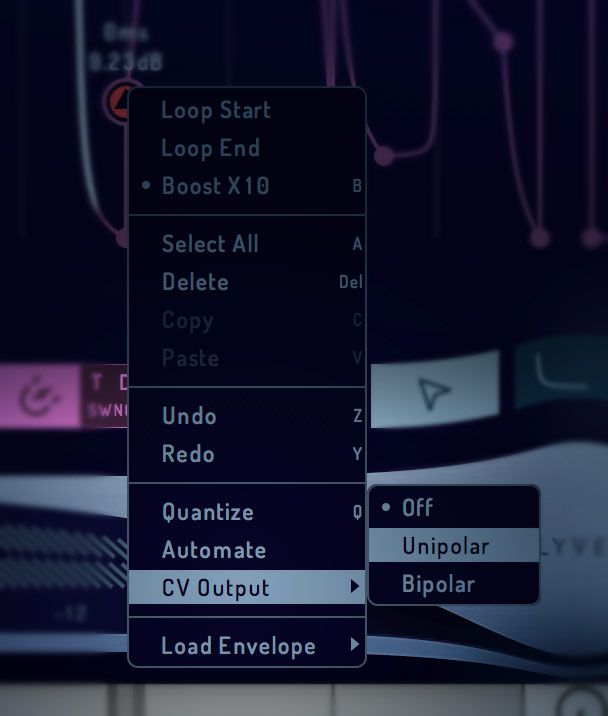
Unipolar/Bipolar CV (Control Voltage)
This provides a Control Voltage output that can be used to control external synthesizers, specifically modular synthesizers. Hook it up to your Eurorack for some of the most elaborate envelope generators available today! To enable CV, right click on a node or any space on the Grid.
Note: Delay & Volume In do not affect the CV.
| ! | QUICK TIP Only DC-coupled audio interfaces can generate DC signals fit to control a modular synthesizer. Expert Sleepers has an excellent website, containing a list of compatible hardware and nifty DIY tricks for using AC-coupled interfaces. http://www.expert-sleepers.co.uk/silentway.html |
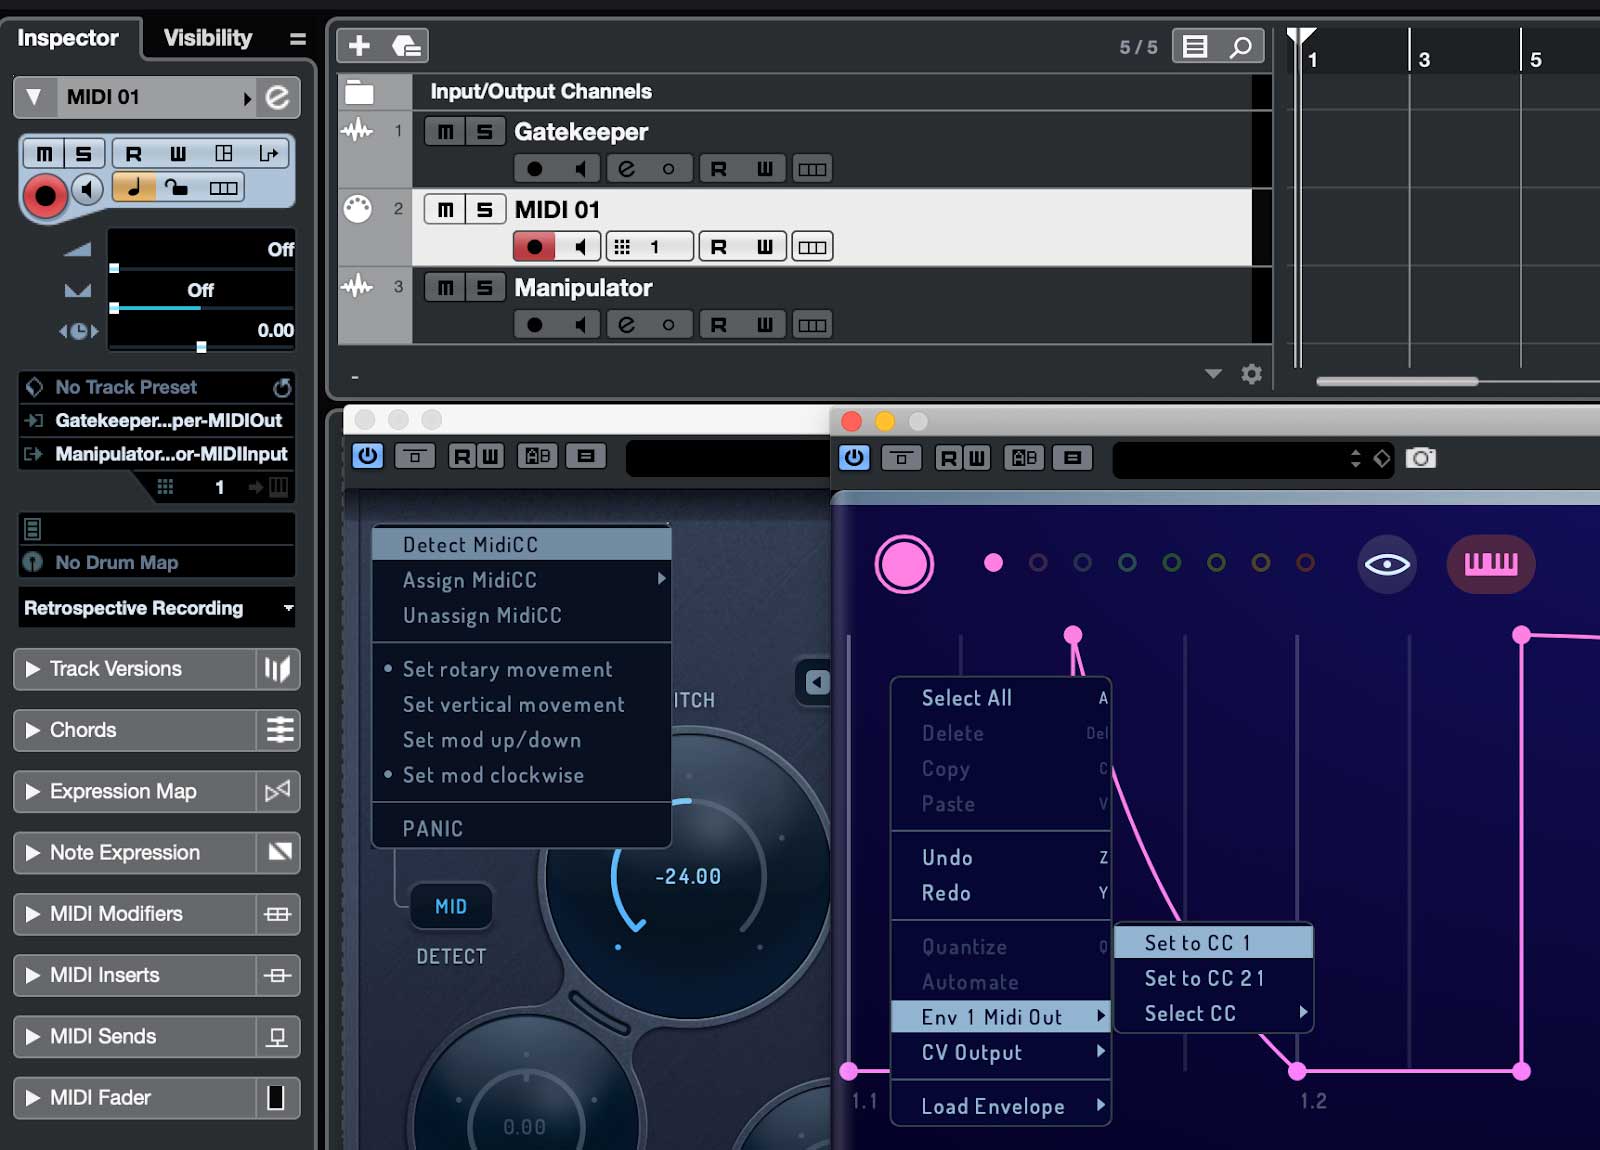
MIDI Controller Output
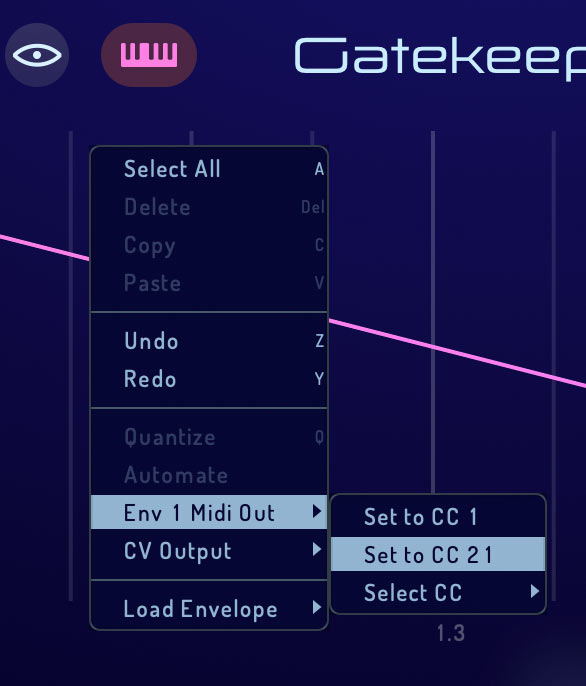
Gatekeeper can send MIDI Control Change messages to control other synthesizers or effects.
To send MIDI CC, right click on the envelope’s background and choose “Env 1 Midi Out”->”set to cc 1” or if you would like to set a custom CC number click “Env 1 Midi Out”->”Select CC”.
Note: MIDI has a much lower resolution and scan rate than audio, and midi controlled parameters on most synthesizers are smoothed and slowed down.
Automating Nodes
To automate a node, right click on the node and select Automate. This will bind the node with one of the 64 automation channels available for Gatekeeper. To see which automation channel was bound to the node, right click again and the information will appear — the first node will bind to channel 1 and so on. Each automation channel sends three separate parameters to the Host: Time (from 1 to 10 seconds), Amp, and Curve. These three parameters will be labeled: “Auto1 time, Auto1 amp, Auto1 curve”.
In Pro-tools: each time you bring the automation menu for a node it will rotate between Amp, Time and Curve.
Detect MIDI CC
To use the “MIDI learn” feature, click a control and select the Detect MIDI CC option, and then move the knob or fader on your controller that you wish to associate with that control. The plugin will wait for a MIDI control change signal, and then assign the control number and channel to the corresponding control on the plugin.
MIDI Program change
You may send program changes on MIDI CC #119. The control value will correspond to the preset order in the “myPresets” folder (the first 128).
MIDI All notes off / Panic
Sending a MIDI CC# 123 will send an “All notes off” midi command to the synthesizer. MIDI CC# 120 is a panic control – and will completely restart the plugin.
It is also possible to right-click the background of gatekeeper (not on any controller or envelope) and select “Panic”
Synchronization to host – Important information
When Gatekeeper is on “Auto Play” and the grid is set to beat divisions (not TIME), it will synchronize to the host by calculating its absolute position as if it were triggered from the start of the timeline.
This is done in order to ensure that each time you play your song, the envelope will play from the correct place. However, this does not play well with time modulation. In this case, we suggest using MIDI to trigger the envelope, or changing the grid to “Time mode”.
Also, if you would not like the tempo to affect the time of the envelope, set the grid to “TIME” instead.
Keyboard Shortcuts #
If the keyboard shortcuts interfere with your workflow,
you may turn them off by pressing the help button on the top right corner.
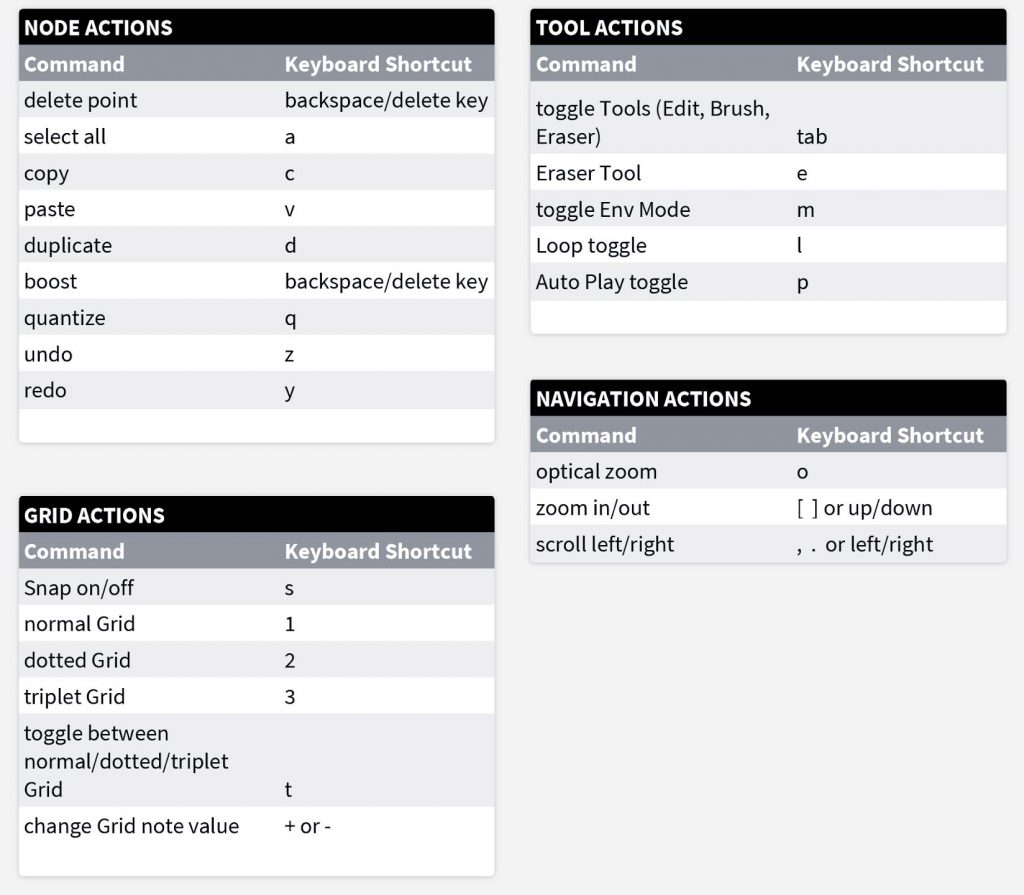
| ! | QUICK TIP Click the help icon to see a listof the keyboard shortcuts Click the help icon to see a listof the keyboard shortcuts |
How to connect MIDI out #
Gatekeeper can send MIDI Control Change messages to control other synthesizers or effects.
To send MIDI CC, right click on the envelope’s background and choose Env [x] Midi Out->set to cc [x] or if you would like to set a custom CC number click Env [x] Midi Out->Select CC.
Note: MIDI has a much lower resolution and scan rate than audio, and midi controlled parameters on most synthesizers are smoothed and slowed down. With that in mind, all nodes produce sample accurate timed midi events and the curves between them scan at 1khz.
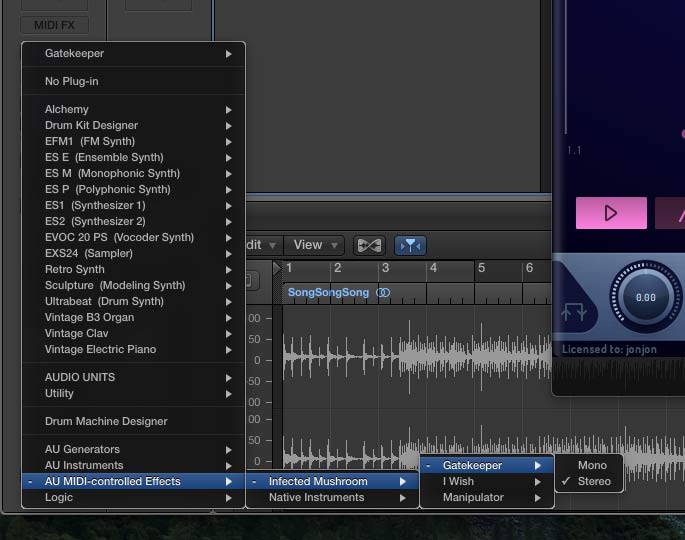
Logic: #
- Open an instrument channel.
- Open gatekeeper as a midi plug-in
- Open an instrument or midi controlled effect in the instrument slot
- Right click an envelope in gatekeeper and choose: Env 1 MIDI Out->Set to CC 1
(Repeat this step for every one of the eight envelopes you intend to use) - Set the instrument’s desired control to learn MIDI CC
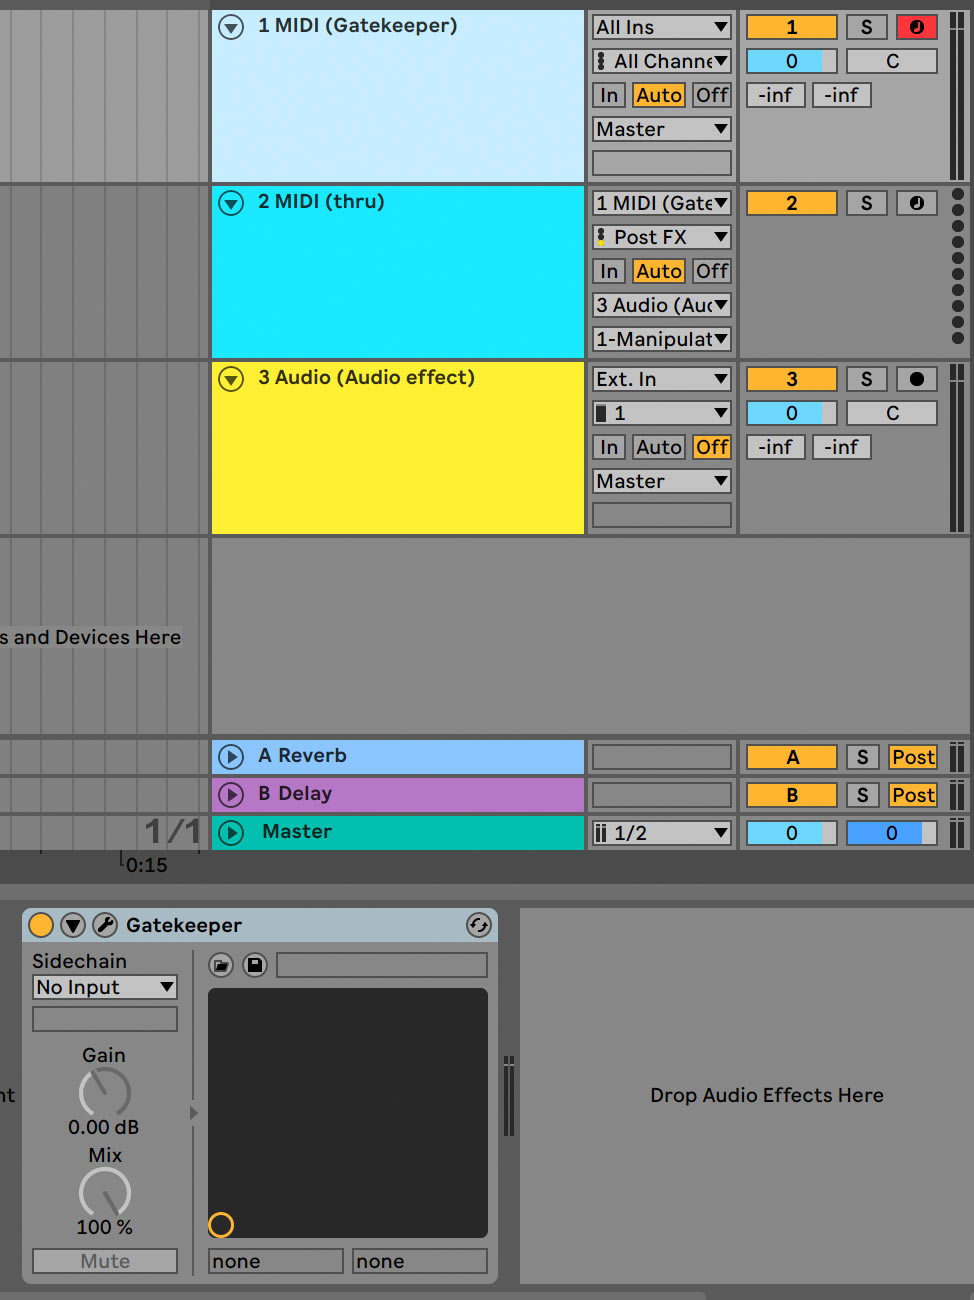
Ableton Live: #
- Open a midi channel and drag Gatekeeper onto it.
- Right click an envelope in gatekeeper and
choose: Env 1 MIDI Out->Set to CC 1
(Repeat this step for every one of the eight envelopes you intend to use) - Open another midi channel and set its input to receive from gatekeeper’s midi channel.
- To control an instrument load it on the second midi channel and set your desired control to learn MIDI CC.
- To control an effect, open an audio channel, route the second middle channel (thru) to the audio channel, and then load an effect to set your desired control to learn MIDI CC.
Important note: As of now only vst2 works correctly in Ableton with those midi features. (both in and out) 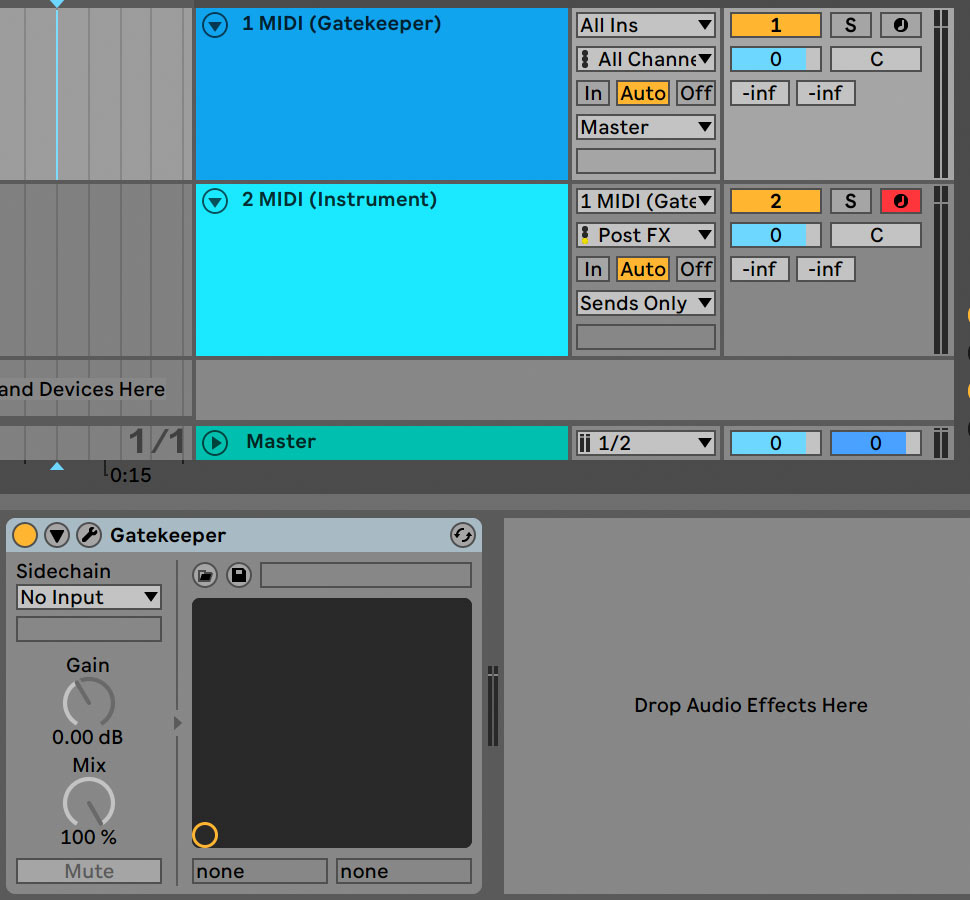
Cubase: #
- Load gatekeeper as an insert effect
- Right click an envelope in gatekeeper and choose:
Env 1 MIDI Out->Set to CC 1
(Repeat this step for every one of the eight envelopes you intend to use) - For Controlling an Instrument:
- Load an Instrument (in an instrument track)
- Set the instrument’s midi input to gatekeeper’s output
- Set your desired control to learn MIDI CC.
- For Controlling effects
- Load a midi-capable insert effect
- Open an empty midi track
- Set the midi track to route between gatekeeper to the effect
- Open the effect and Set your desired control to learn MIDI CC.
FL Studio #
- Load Gatekeeper
- Click the settings button at the top left of the instrument
- Switch to the VST Wrapper settings
- Set the MIDI Output port to 1
- Load the instrument or effect you would like to control
- Set the MIDI Input port to the same as gatekeeper
- Open the effect and Set your desired control to learn MIDI CC.
Enjoy using Gatekeeper!