⬇️ Download this manual in PDF form Here

USER MANUAL
v1.1.3
https://polyversemusic.com/support
By
The information in this document is subject to change without notice and does not represent a commitment on the part of Polyverse Music. The software described by this document is subject to a License Agreement and may not be copied to other media. No part of this publication may be copied, reproduced or otherwise transmitted or recorded, for any purpose, without prior written permission by Polyverse Music.
Polyverse Music and associated logos are registered trademarks of Polyverse Music Inc.
Mac, Mac OS, GarageBand, Logic, iTunes and iPod are registered trademarks of Apple Inc., registered in the U.S. and other countries.
Windows and Windows Vista are registered trademarks of Microsoft Corporation in the United States and/or other countries.
All other trademarks are the property of their respective owners and use of them does not imply any affiliation with or endorsement by them.
Thanks:
- A big thank you to Michał Garstecki for helping us develop the algorithm of comet. You are an inspiration!
- Special thanks to our Beta Test Team, who were invaluable not just in tracking down bugs, but in making this a better product.

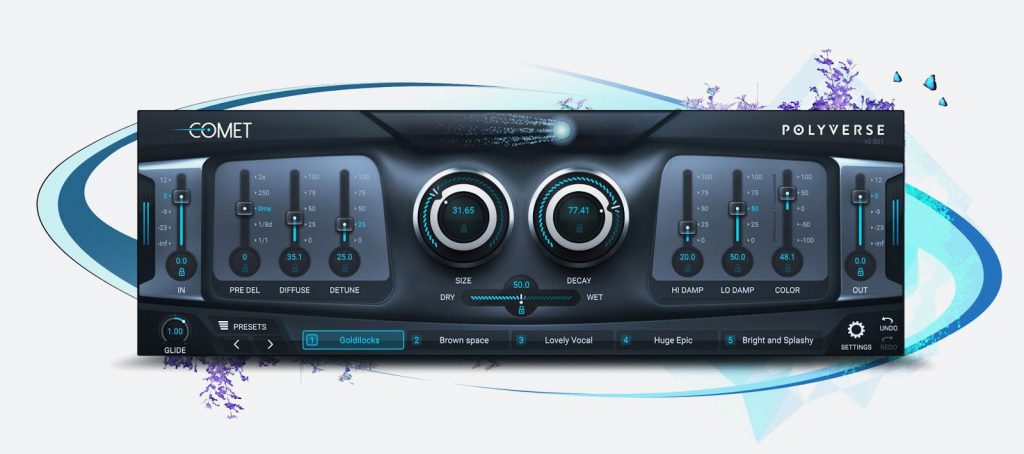
About Comet #
Polyverse Comet is an algorithmic reverb with a beautifully smooth and lush sound. Its controls are designed to provide smooth automation and morphing capabilities for all parameters, even when changing presets and settings.
Installation #
To install Comet, simply run the installer and follow the instructions on your screen. For free tutorials and videos about setting up and using Comet with your favorite DAW (Digital Audio Workstation), please visit our website at https://polyversemusic.com/support.
When using Comet for the first time, a registration dialog will appear. To register and authenticate the plugin, first download, then drag and drop the key file you have received in your purchase confirmation email onto the dialog box.
If you’ve lost your confirmation email, you can re-request one from our support page at https://polyversemusic.com/support.
Compatibility:
Windows: 64/32 bit VST, AAX
OSX: 10.7+ 64 bit VST, AAX, AU
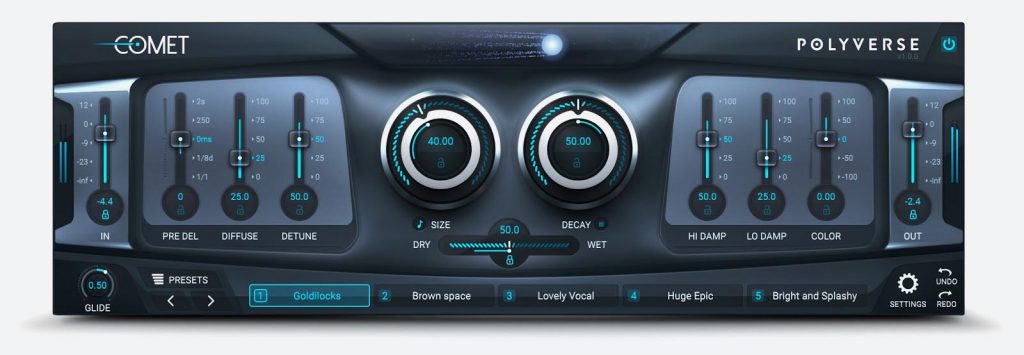
Main Controls #
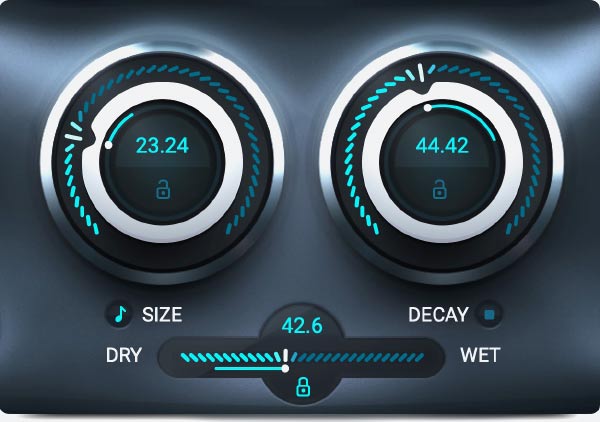
Size
Adjusts the size of the emulated acoustic space from 1 cubic centimeter to 1 cubic kilometer. The space emulated in this reverb is multi-dimensional and does not represent a realistic structure.
Note Control
Enables the control of reverb size, morph slots and decay stop via midi notes as indicated under the section “Midi Controls”.
This setting is saved per instance in a project, and is not a parameter.
Decay
Adjusts the decay of the reverb from 0% to 100%.
Setting the feedback to 100% will produce an infinite decay time (self oscillation), while 0% decay will only allow early reflections with no tail.
Stop Tail
To clear the reverb’s buffer and stop the tail, click the stop button under the control.
Dry/Wet (Mix)
Dry/Wet crossfades between the dry and wet signal. At the far right (wet), input signal is fully affected by the reverb; at far left (dry), the input signal is unaffected.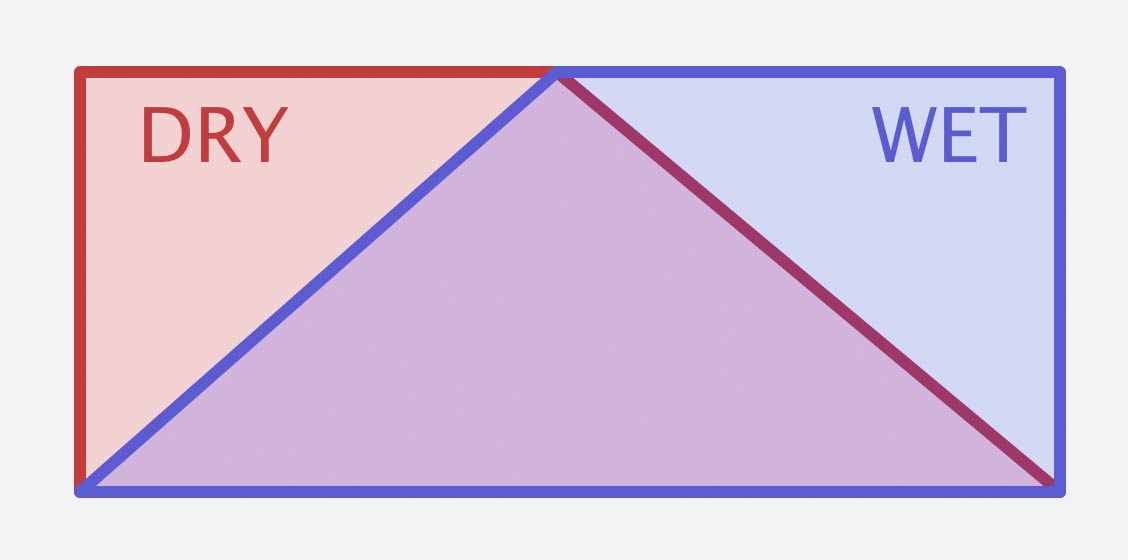
When set at values up to 50%, the dry signal will maintain maximum gain while the wet signal is mixed in. At values above 50%, the wet signal will remain at maximum gain while the dry signal fades out. This allows you to add reverb on an insert track without decreasing its volume.
In
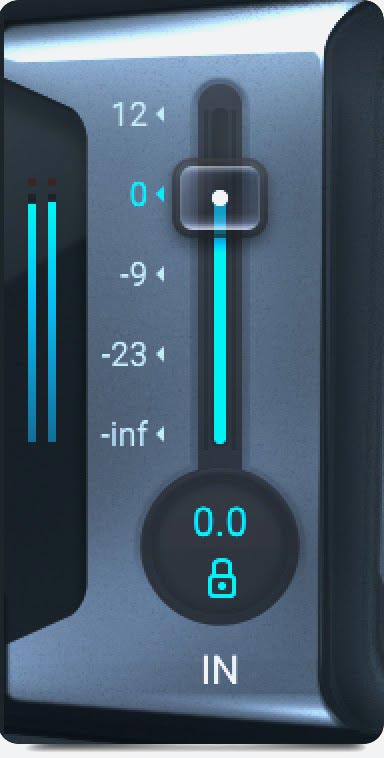
Adjusts the input volume of the reverb and offers up to a 12 dB boost of input signal. Comet has an internal saturation in the feedback path, and boosting the input signal takes advantage of this feature.
 | Word to the Wiz Try experimenting with different input levels to find the right balance of saturation for your sound. |
Out
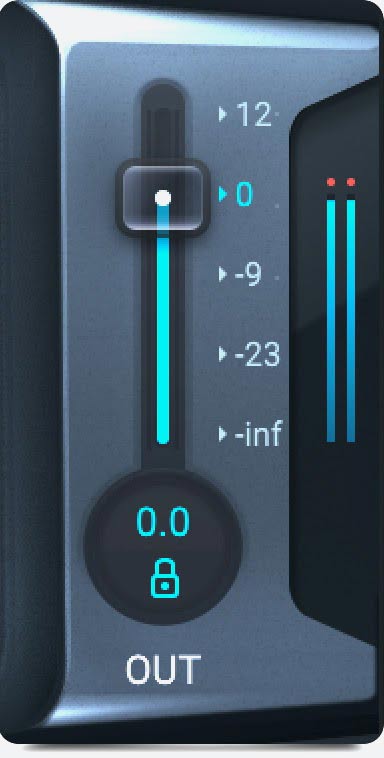
Adjusts the output signal volume of the reverb.
Pre Delay
Adjusts the initial delay between the original signal and the first reverberant sound. The center position (0 ms) represents no delay. Moving the slider up changes pre-delay time in milliseconds (up to 2000 milliseconds). Moving the slider down changes the pre-delay time into tempo divisions from 1/32nd notes up to one whole measure.
Diffuse
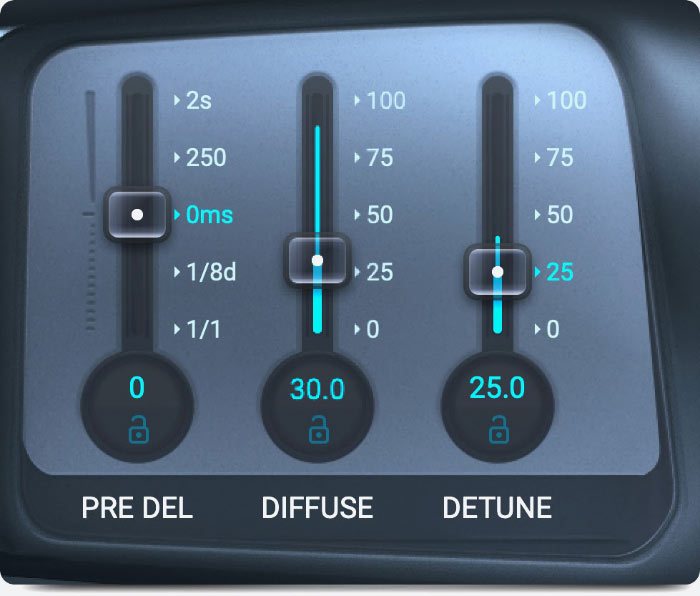
Sets the rate of which the density of reflections build up in the reverb. This makes the reverb more dense and lush when increased or more airy and sparse when decreased.
 | Word to the Wiz Increase the diffuse parameter to make the reverb even more smooth! |
Detune
Detunes the tail of the reverb increasingly as time passes. An internal modulation mechanism (not unlike a synthesizer detune effect) is calibrated to create especially smooth clusters of pitch. A little bit of detune goes a long way.
Hi Damp
Dampens the high frequencies and rolls them off in the feedback path. The more Hi Damp, the darker the reverb will sound over time. High decay values intensify the damping effect.
Low Damp
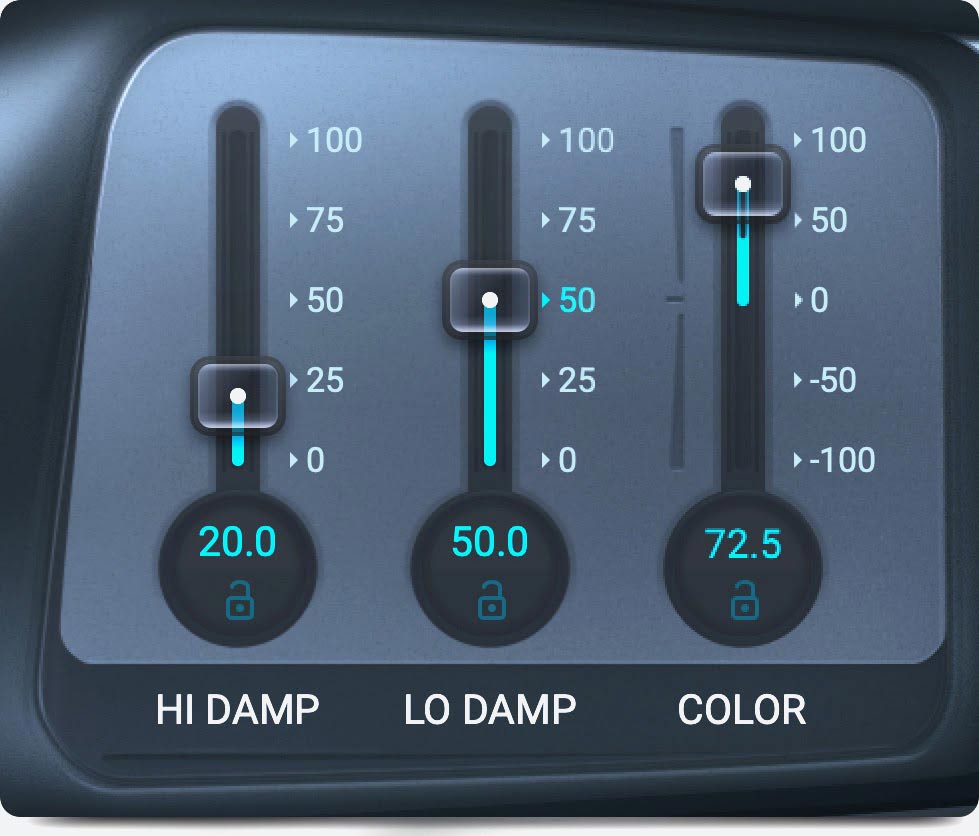
Dampens the low frequencies and rolls them off in the feedback path.
The more Low damp the brighter the reverb will sound over time. High decay values intensify the damping effect.
Color
Adjusts the reverb’s overall brightness and darkness. Settings above 0 will boost high frequencies and cut low frequencies, and settings below 0 will boost low frequencies and cut high frequencies.
Preset-Locks

Click the lock icons to lock or unlock parameters when you switch between presets. When the icons are in the “locked” position, the locked parameters remain unaffected by any change in presets.
 | Word to the Wiz Preset-Locks can be used to single out a parameter that needs to be automated independently while automating the preset morph selector. |
Power

This is a bypass button. When power is on the effect can be heard, and when it is off, the effect is bypassed leaving the source audio intact.
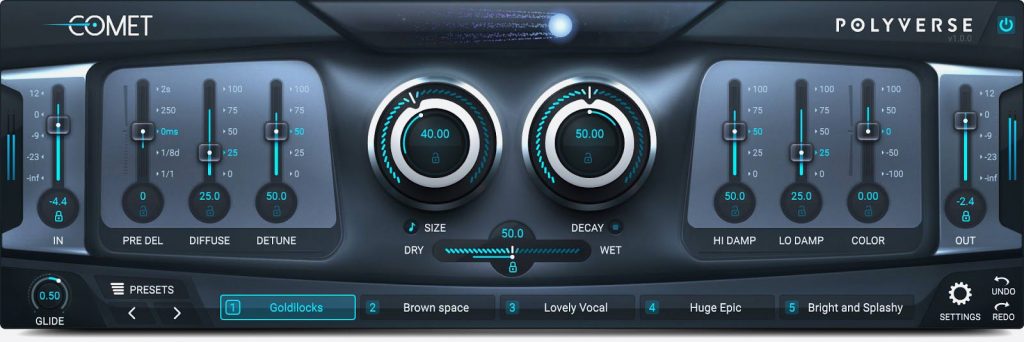
Bottom Controls #
Glide
Sets the amount of time it takes for Comet’s parameters to smoothly transition from one position to another. 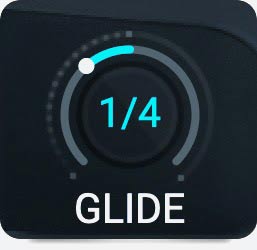
The Glide knob increases or decreases the transition time between automated parameters, or when morphing between different preset slots. This effect creates one of Comet’s unique features, an evolving reverb sound that is elastic.
Center (or 12 o’clock) is a glide time of 150ms. Moving the dial counter-clockwise changes glide time into tempo divisions (from a 1/16th note to 16 full measures) moving clockwise increases by time (from 150ms up to 30 seconds).
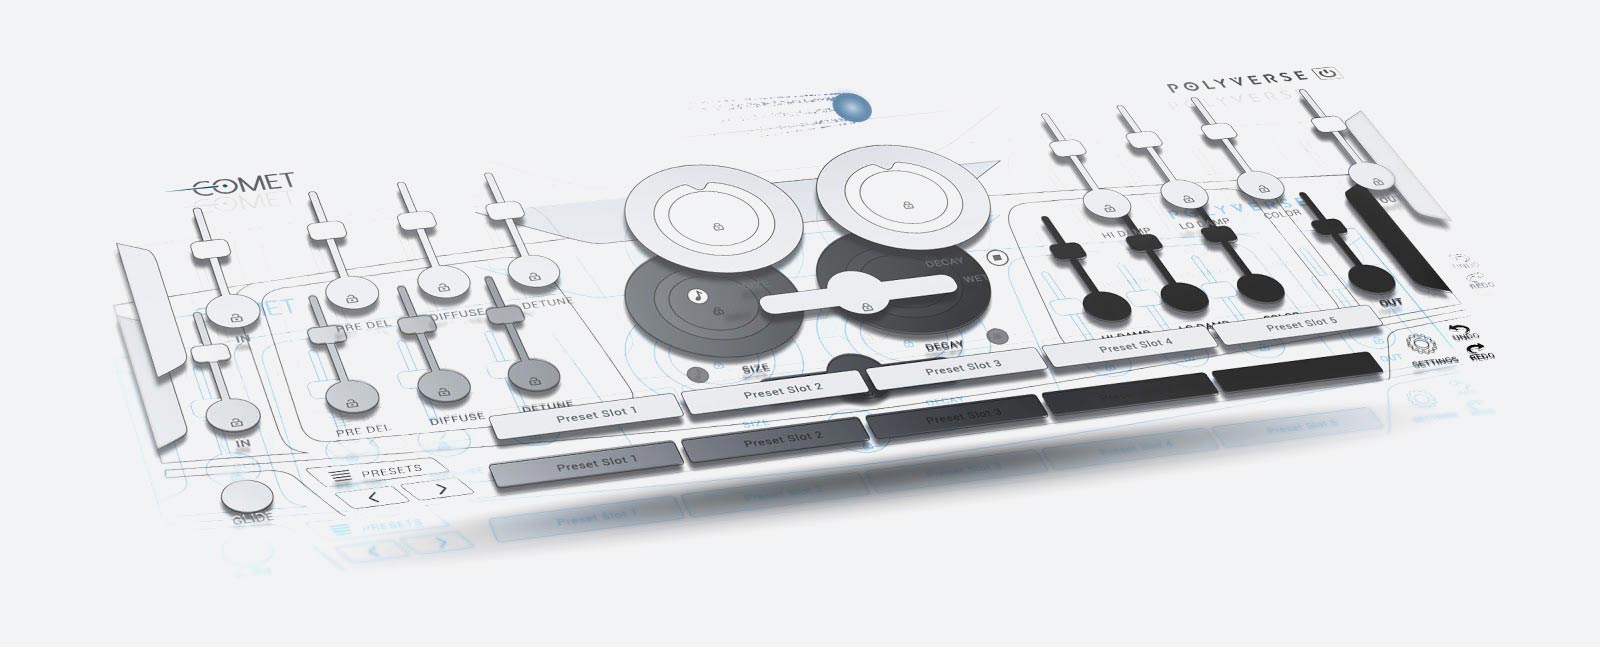
Preset Morphing Slots

Comet has 5 preset slots created to take advantage of its morphing capabilities. These preset slots allow you to smoothly transition or “morph” between up to 5 different room settings, and are fully automatable. Morphing speed is controlled via the glide knob.
To change slots, click the desired button. To copy a slot just drag the slot onto the destination slot.
* see “Key Switches for Morph buttons” for MIDI control options.
 | Word to the Wiz The parameters in the preset slots don’t necessarily have to be a stock preset. Any parameter can be user-defined, and will remain unchanged when morphing between slots. |
Presets

Click the presets button to open the Preset Library. Or click the arrows to navigate between presets for the currently selected preset slot.
Undo/Redo

Click Undo to reverse the most recent parameter or preset change, and click Redo to restore it.
Settings
Opens the settings page.
Preset Browser #
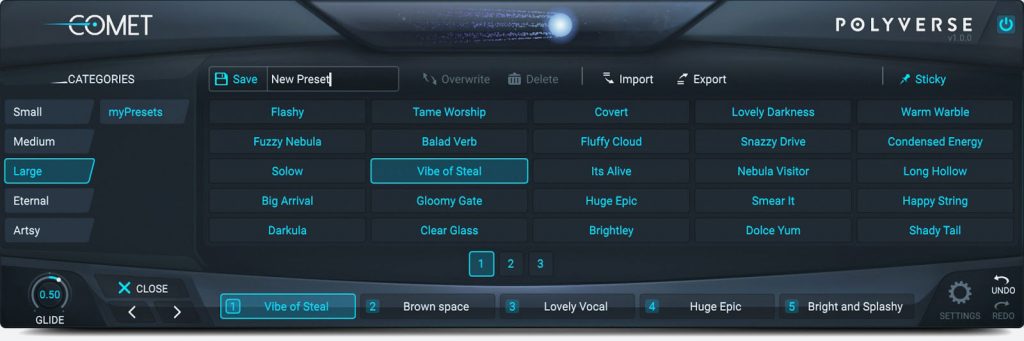
To browse Presets, click the Left/Right arrows located on either side of the Presets Bar. Clicking directly on the Presets Bar will open a pop-up menu which allows you to browse through the folders of factory presets, save an original preset, or load a new preset bank.
*Note: the user’s original presets are saved to the ”myPresets” folder.
Saved presets can be found in the following locations:
MAC: <user>/Library/PolyVerse/Comet/Comet-Presets.ppb
PC: \Users\<user>\AppData\Roaming\PolyVerse\Comet\Comet-Presets.ppb
| Word to the Wiz In the preset library, the bottom panel controls are still active. This means that you can still switch between preset slots, adjust the glide, and navigate between presets using the preset selector. |
Categories
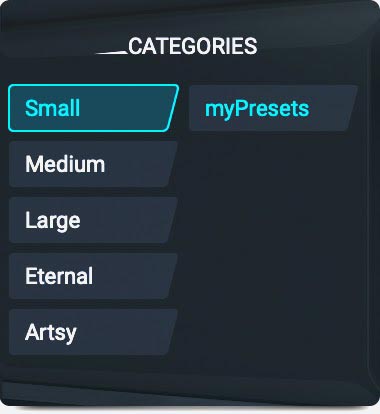
Contains the different categories of reverb presets, including the user created section.
My Presets
myPresets category lets you manage your own presets.
 | Word to the Wiz If you import your own bank it will appear as a category on the right side of the Categories Area |

Save
By clicking in the blank area next to “Save” you can type in the name of the preset you want to save, then hit Save to store that preset in “myPresets” category
Overwrite
When in “myPresets” category, clicking this will overwrite your currently selected preset with the current settings of Comet Reverb
Delete
Clicking this will delete your currently selected preset
| Quick Tip Use Undo and Redo to go back if you accidentally delete or overwrite a preset |
Import/Export
Imports or exports presets to and from the plugin. To export your preset list, click export and select the destination where you want to save the file.
To Import, click Import and choose a comet bank file. The bank will appear as a temporary category under “My Presets”.
To keep presets from temporary imported banks, simply save them.
Clicking presets in imported banks will automatically fill in the preset name making it easy to save presets to the “My Presets” category.
Sticky
![]()
Allows the loading of different presets without closing the browser, effectively enabling the ability to audition different presets before returning to the main interface.
Close

Return to the main interface.
Settings #
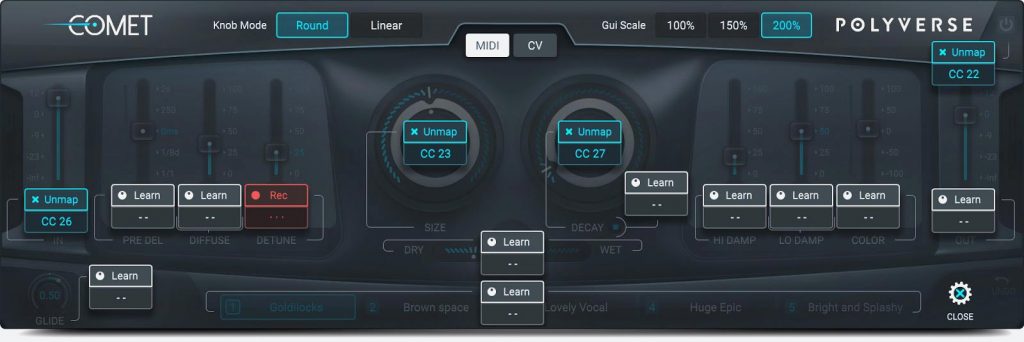

Knob Mode
You can choose between whether the size and decay knobs move linearly or circularly. When in Circular Mode, the larger the circle you draw around the knob with your mouse, the more precisely you will be able to adjust the knob. In Linear Mode, clicking on the knob and moving the mouse up or down will change the parameter accordingly.
GUI Scale
The size of Comet’s interface can be adjusted to 3 settings: 100%, 150%, and 200%. This applies to all instances of Comet, based on the last setting chosen.
MIDI / CV
Switches between MIDI CC and CV Input Mode. In MIDI Mode, it is possible to assign MIDI Control Changes to Comet’s parameters. In CV Mode, it is possible to assign Control Voltage inputs.
MIDI CC Learn

Map a controller to any of Comet’s parameters. To use, simply click the learn button, then send MIDI CC from any connected controller. 
While waiting for midi CC, a red REC is displayed.

The parameter turns blue when MIDI CC has been properly received To remove a MIDI CC from a controller, click “Unmap”.
Word to the Wiz: You can also type the CC number to assign MIDI, but you must first ensure that the plugin channel is receiving midi signal
CV In

Control voltage signals may be routed via the side-chain inputs of Comet. Click the CV button to select which channel (left or right) will control the parameter, or select “Stereo” to have stereo modulation enabled.
All CV signals are routed through our Glide mechanism except: morph slots, bypass, and tail stop which also do not have a stereo cv option.
We highly recommend using our GateKeeper Plug-in to generate CV signals for use with Comet.
Daw Limitations:
- Pro-Tools does not support stereo side-chain. Right and Stereo options will use the left channel.
- In Logic Pro X one must route through a bus channel for stereo CV channels.
Close

Return to the main interface.
Controlling Controllers: #
Reset to default
To reset a controller to its default value, double-click it.
Fine Tune
To fine tune a controller press “Shift” while dragging the controller.
Sliders will also allow for fine tuning when dragging the mouse away from the control (to the side for vertical sliders or up or down for the wet slider which is horizontal). Round movement for knobs also allows finer control when moving away from the knob.
Text Values
Comet’s controls have a numeric display which shows their current value. To type in a specific value, simply double-click the number and enter a new value.
MIDI Controls: #
Key Follow
Comet’s Size parameter responds to MIDI notes for a key-follow effect. C3 key is the center and has no effect. C4 will shorten the reverb by a factor of 2 (up an octave) and C2 will lengthen it by a factor of 2 (down an octave). For this function to work, “Note Control” must be enabled.
Note: At very small sizes (under 10%) pitch tracking is not 100% accurate due to non linearities.
Pitch Bend
Pitch bend also controls the Size parameter. The range is set to one octave up or down. For this function to work, “Note Control” must be enabled.
Key Switches for Morph buttons
Notes C-2, D-2, E-2, F-2, G-2 are mapped to change the morph slot selection respectively. For this function to work, “Note Control” must be enabled.
MIDI Program change
You may send program changes on MIDI CC #119. The control value will correspond to the preset order in the “myPresets” folder (the first 128).
MIDI Panic
MIDI CC #120 is a panic control – it will stop any reverberation by clearing the buffer.
It is also possible to click the stop icon under the Decay control.
If “Note Control” is enabled, pressing note G#-2 will stop the tail.
With or Without MIDI? #
Comet can be inserted into audio or instrument tracks just like any audio effect. However, some of its features involve responding to MIDI notes and MIDI CC messages.
If you would like to use Comet as a regular effect, just load it in one of the insert slots on your DAW, and you’re done!
If you want to use MIDI to separately trigger the envelopes manually, please refer to the following pages for instructions on routing MIDI within your specific DAW.
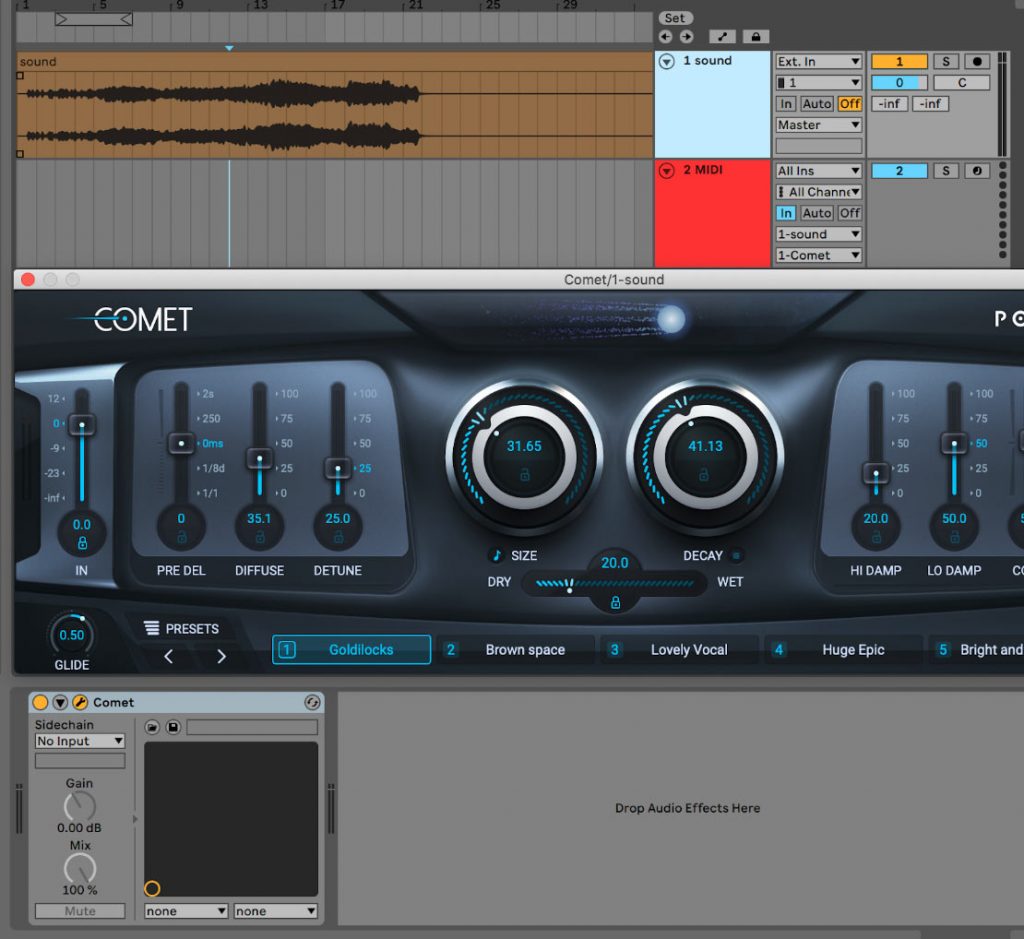
Ableton Live
- Click the “I-O” button to show the input and outputs.
- Create an audio track, and add some audio onto it.
- Add Comet onto the audio track.
- Create a blank MIDI track.
- Set the MIDI track’s output to the audio track with Comet.
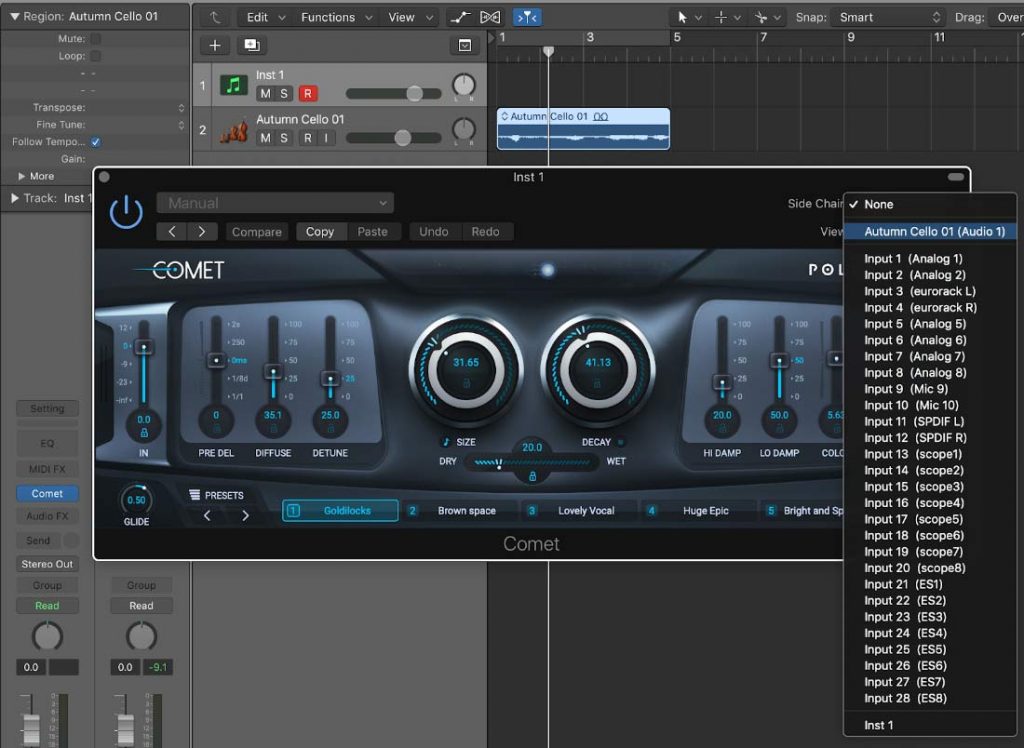
Logic X
- Open an instrument track.
- Click on the instrument slot to select Comet (Under AU MIDI-controlled Effects).
- Open a new audio track and place your audio file inside it.
- Open the Comet plugin interface. In the top right, select your sidechain input to be the same as the audio track.
- Mute the audio track, as its signal is now being routed through Comet.
- Select/Enable the plugin’s instrument track.
Pro Tools
- Create a new audio track
- Add Comet as an insert effect
- Place an audio file in the track
- Create a new MIDI track
- Route the MIDI track’s output to the plug-in
- Arm the MIDI track

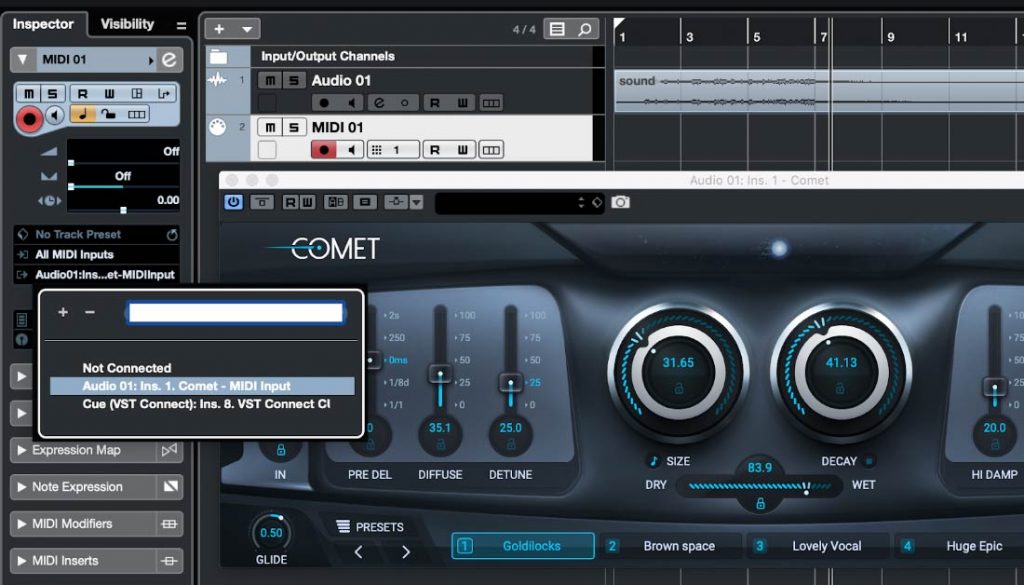
Cubase
- Add an audio track
- Add Comet as an insert effect
- Place an audio file in the track
- Add a MIDI track
- Set the MIDI track’s output to the Comet plugin.
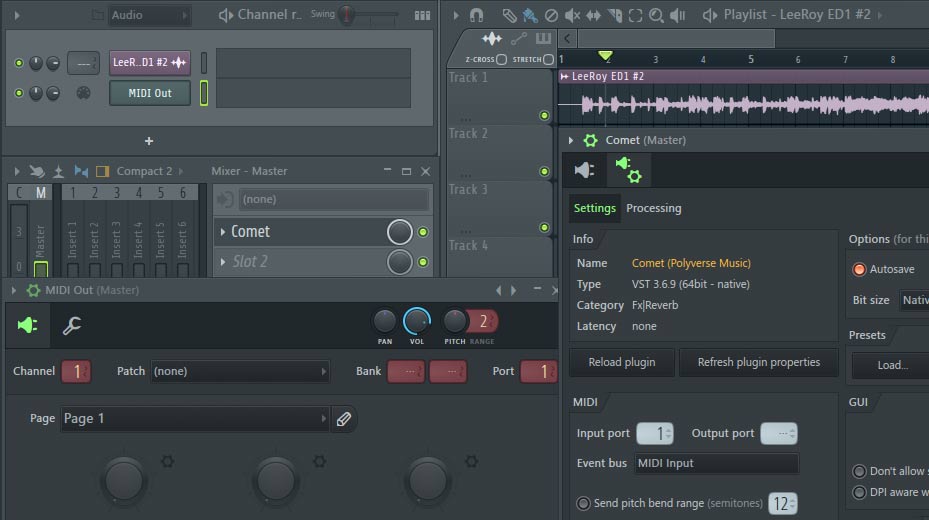
FL Studio
- Drag an audio file to your playlist and route it to “Track 1” on the mixer.
- Load Comet as an insert on “Track 1” on your mixer.
- Open a “MIDI Out” plug-in and set the Port to 1.
- Set the Comet MIDI input port to 1 as well
- Select the “MIDI Out” channel
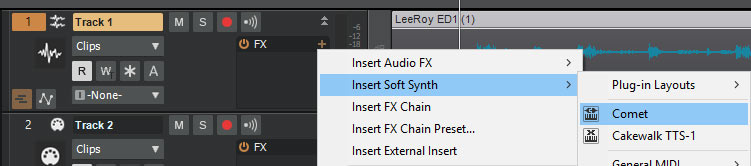
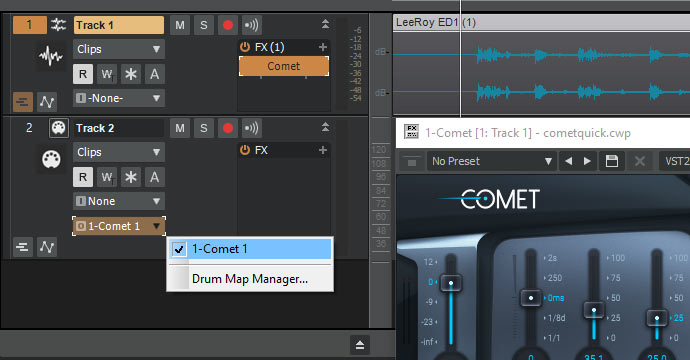
Cakewalk
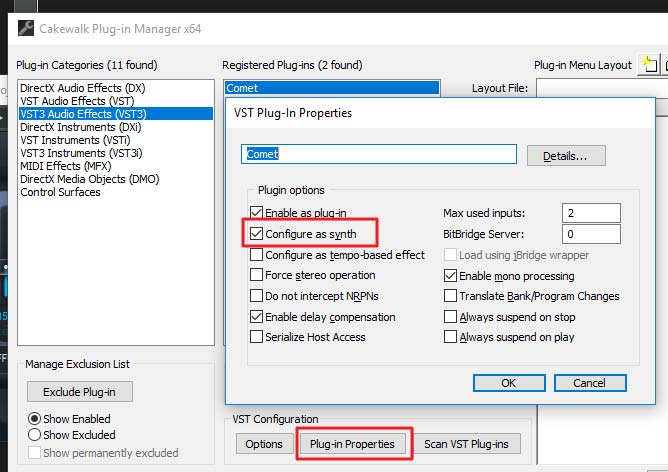
- Configure Comet as a synth in “Cakewalk Plug-in Manager”
- Import an audio file to an audio track ,
- Inset Comet as a “soft synth” on that track.
- Create a new MIDI track,
- Set the MIDI track’s output to Comet .
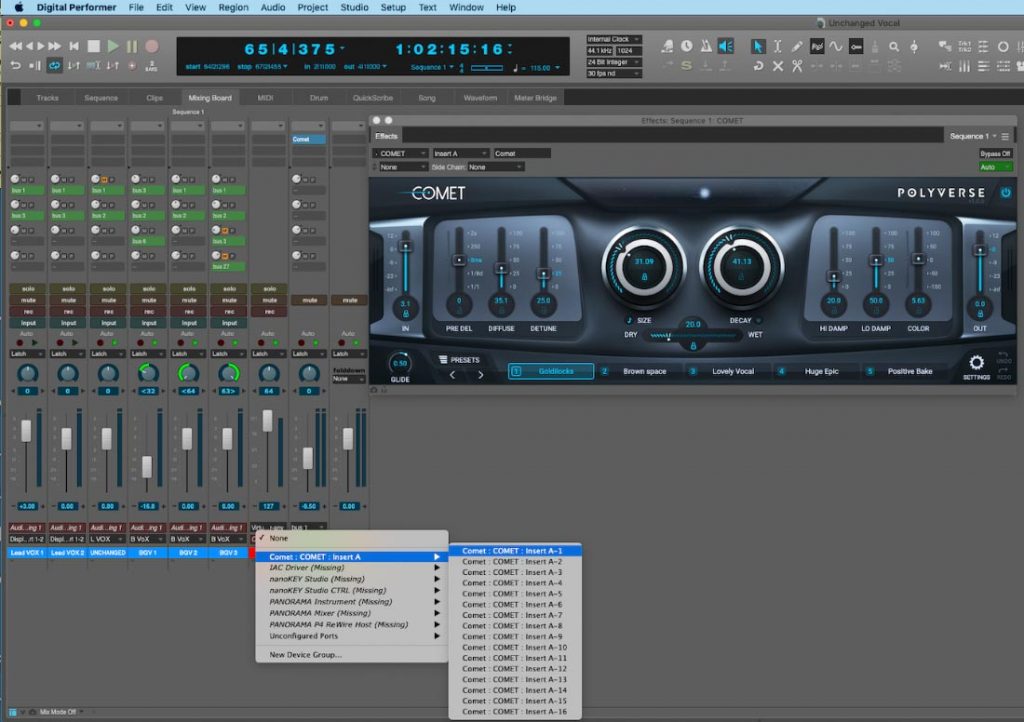
MOTU Digital Performer
- Add an Audio or AUX track
- Insert Comet as an insert effect
- Add a MIDI track
- Set the MIDI track’s output to the Comet plugin
Thank you for trying out Comet